CX44 Shaped Panels
Sidewall Insert with Rigid Sheet Foam
Sidewall Insert with Rigid Sheet Foam

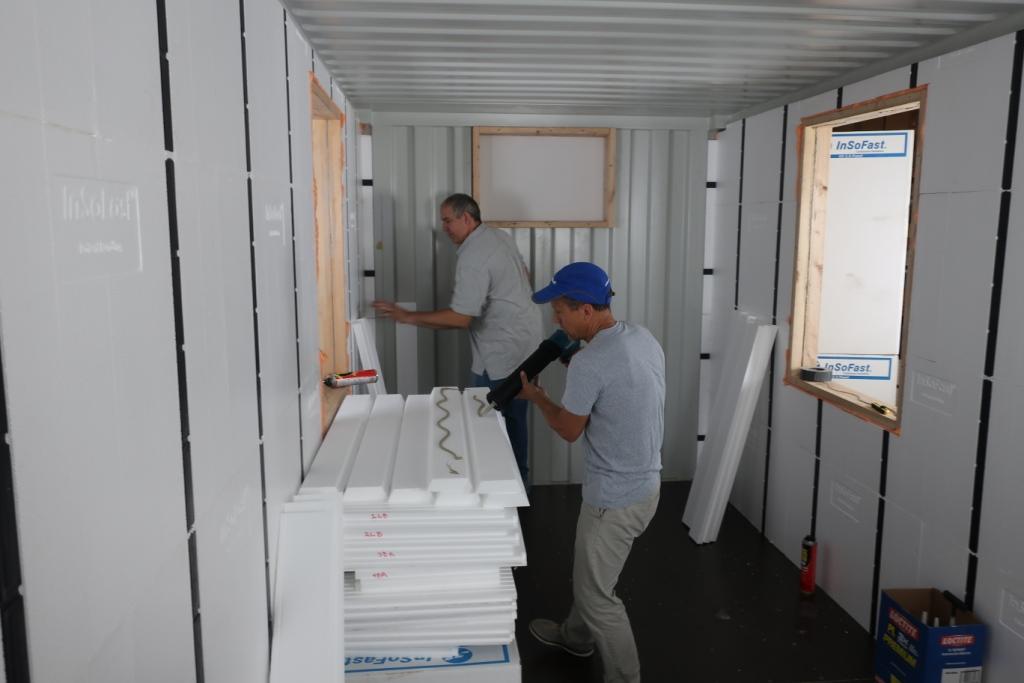
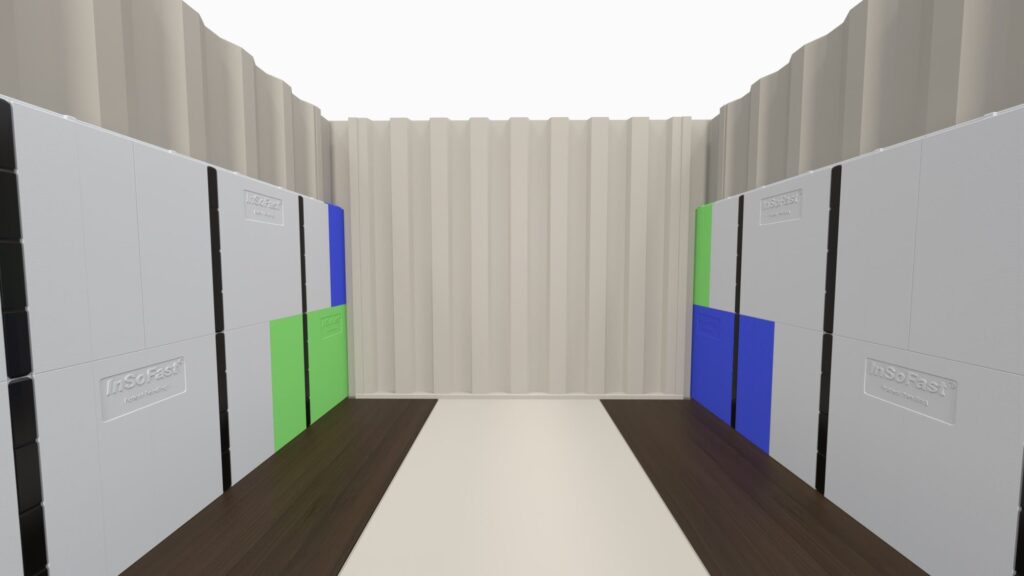
- The sidewall of a shipping container interior applications. If you just need to just insulate a container for storage and covering the insulation for fire safety and protection is not a concern we recommend the (I-SWI) Side Wall Inserts to infill the wall’s corrugated voids to prevent hidden condensation. The flat stock foam panels and inserts is a three-step process insulated first with the (I-SWI) Side Wall Inserts to infill the wall’s corrugated voids preventing hidden condensation. Then locally sourced (48″ x 96″) flat stock sheet insulation are installed over the inserts completing the continuous thermal layer before the traditional interior framing and services can be installed. This is the least expensive method available but increase the labor, material co-ordination and complexity in details.Then install locally sourced board stock insulation over the steel containers exposed metal surfaces.
- Inexpensive method when modifying older containers with dings and dents prevent cold condensation surfaces.
- Method when modifying older containers with dings and dents.
- Industrial fast track application not suitable for habitual spaces, storage only.
- Check with local code restrictions for exposed foam insulation fire requirements.
- Traditional framing, wood or steel studs, would need to be installed with drywall and optional additional insulation in order to make the container into a habitable space
Sidewall Inserts:
- (I-SWI Side Wall Inserts) = 30 pieces 48 inches long covering 120 lineal feet of corrugation in-fill or (15) 8′ tall sections
Products Required
(I-SWI Side Wall Inserts)
Side Wall InsertsOne box of Side Wall Inserts covers 112 Lineal feet of corrugation.

| Dimensioned to fit | 48in x 7 3/4in x 1 1/4 in |
| Coverage | 2.5 sq-ft |
| R-Value ASTM C518 | R-5.3 |
| Closed-Cell, injection-molded EPS | ASTM C578 Type II |
| Canadian Standards | CAN/ULC S701 Type 2 |
| Foam Density | 1.00 lbs per cubic foot |
Installing Sidewall Inserts into a Container
The long sidewalls of the shipping container insulated with Sidewall Inserts.

The long sidewalls of the shipping container is a three-step process using Sidewall Inserts, locally sourced flat stock sheet foam, and traditional framing systems.

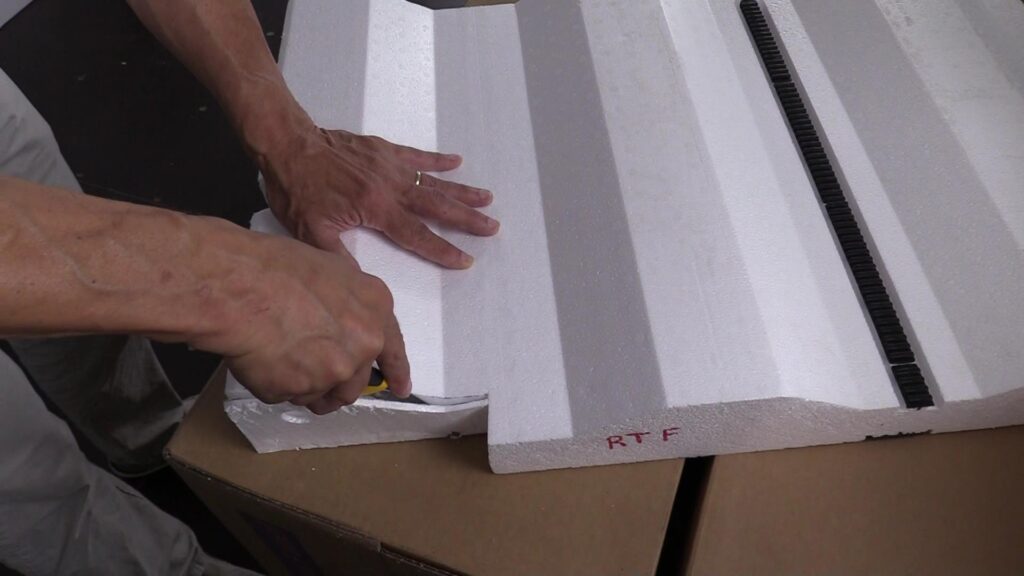
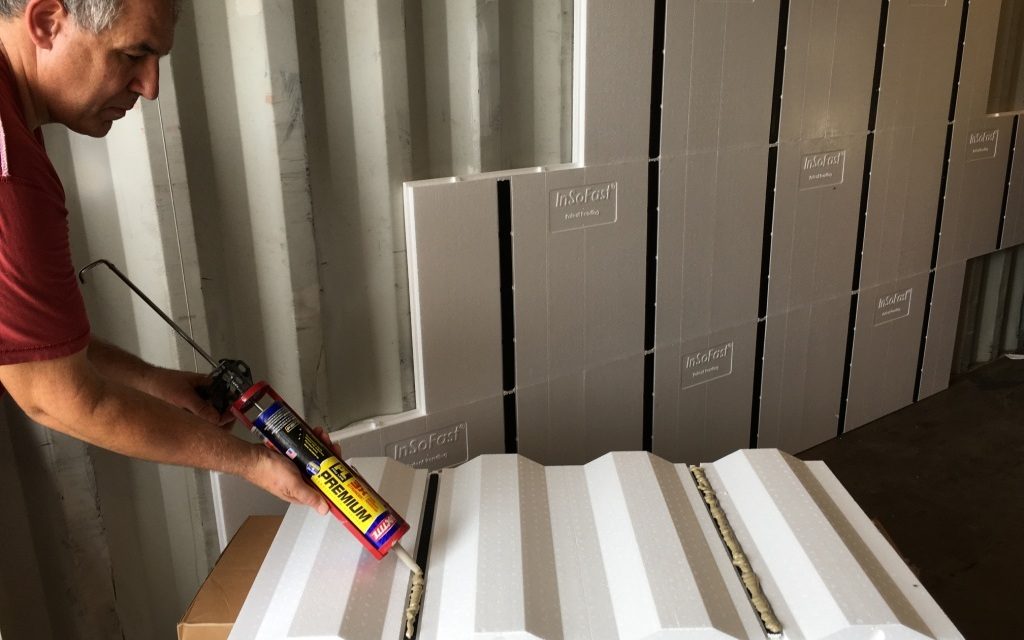
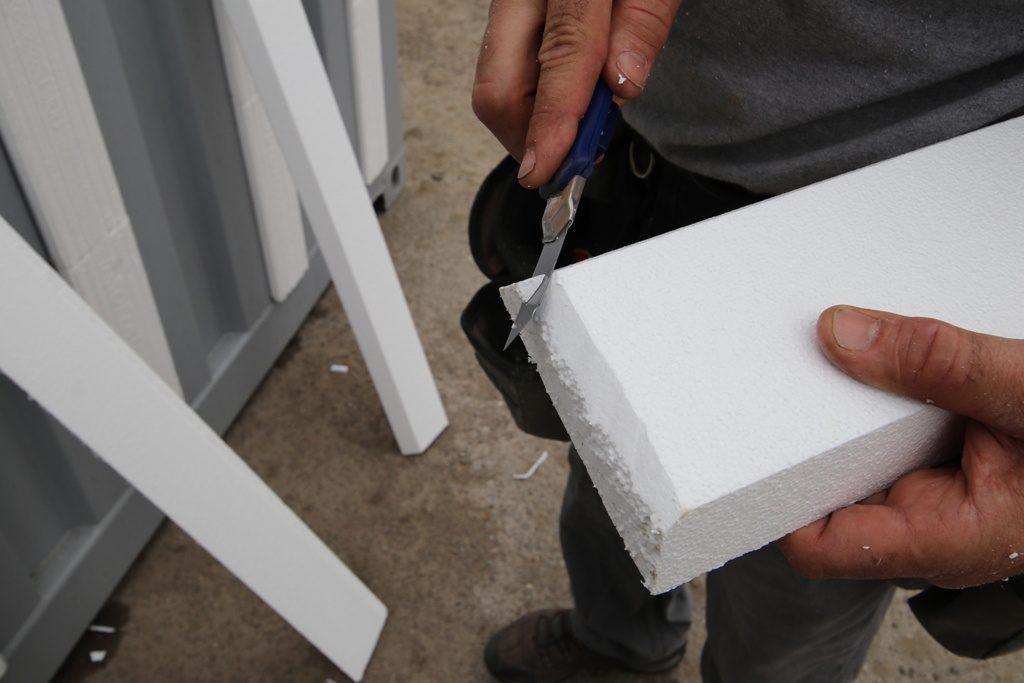
Place a bead of adhesive in an “S” pattern down the center of the backside of the sidewall insert. Set the inserts into the lower half of the sidewall corrugations. Once in place seal the top of the insert with a bead of spray foam. Continue to cut, fit and glue all the insert onto the sidewall corrugations. Spray foam and seal all your work.
Flat board stock foam and framing by others.
*Locally Sourced Foam Insulation by others:
| Interior sheet foam Insulation required: | 20′ Standard | 20′ High Cube | 40′ Standard | 40′ High Cube |
| Foam Board Insulation by others: | 3/4″ x 4′ x 8′ | 3/4″ x 4′ x 8′ | 3/4″ x 4′ x 8′ | 3/4″ x 4′ x 8′ |
| Total square feet w/o swing doors | 472 | 520 | 950 | 1016 |
| Total 4’x8′ sheet foam panels | 15 | 17 | 30 | 32 |
Why use the Corner Post Insert?
Using the corner post takes the guess work out of the corner. The post is an insulated metal angle for attachment of interior finishes for shipping containers. No longer will you have to craft a custom solution to insulate the inside corner.
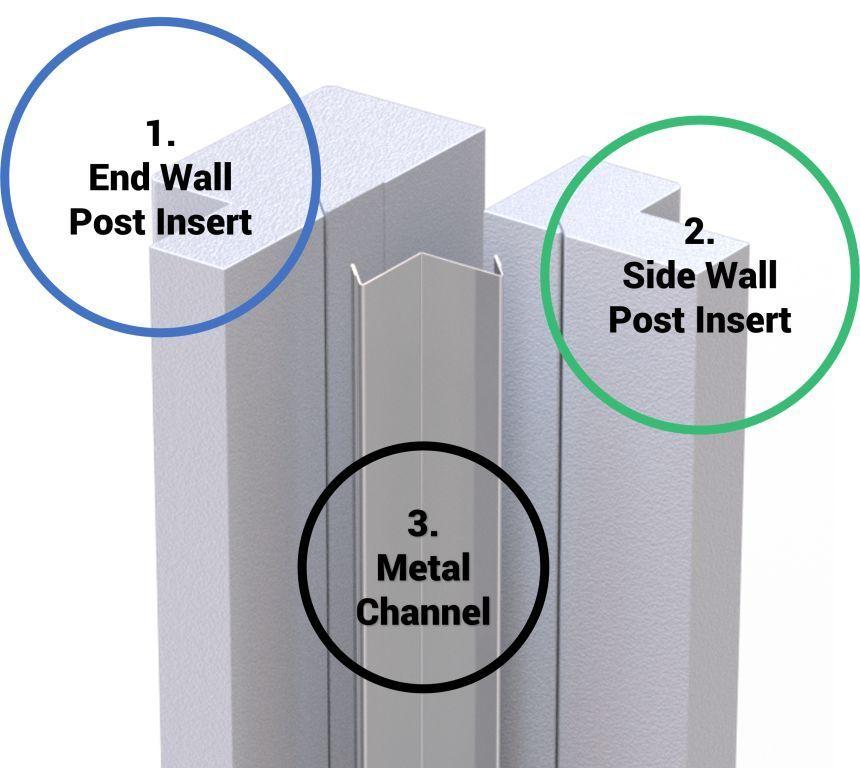
Three easy pieces
Easy as 1-2-3
Container side walls can vary slightly in length. We call this weld seam drift. Always check for proper fit and drift and adjust the corner panel cut length layout accordingly.
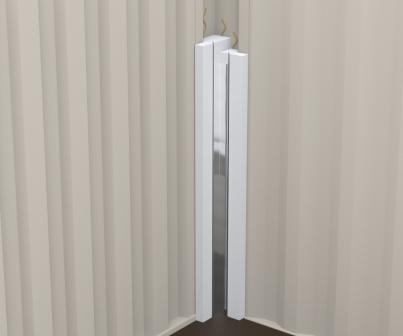
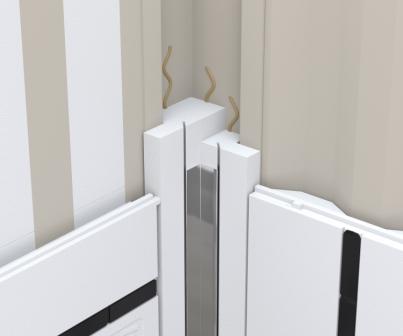
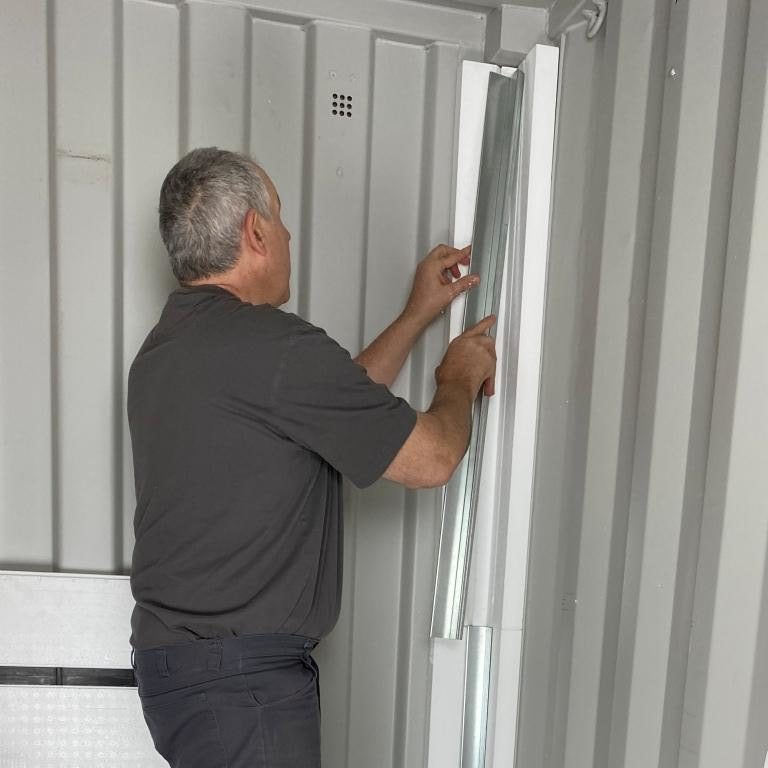
How to place a stud in the corner
The inside corners at the “nose” of the container where 2 different wall geometries collide can be a unique challenge. The corners should look like this when completed. Fill all open spaces/air gaps with spray foam as needed.
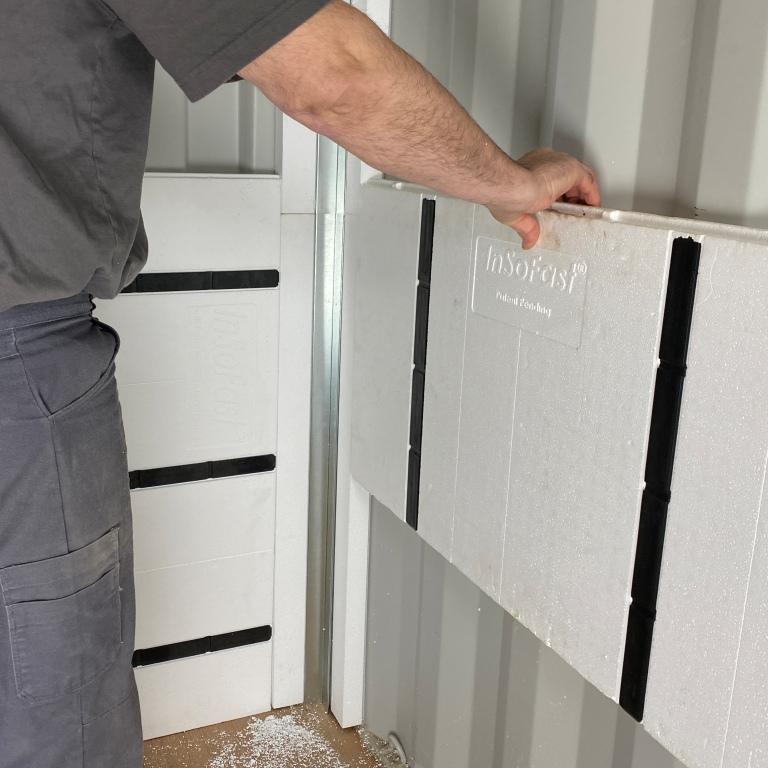
First cut out for the corner brace
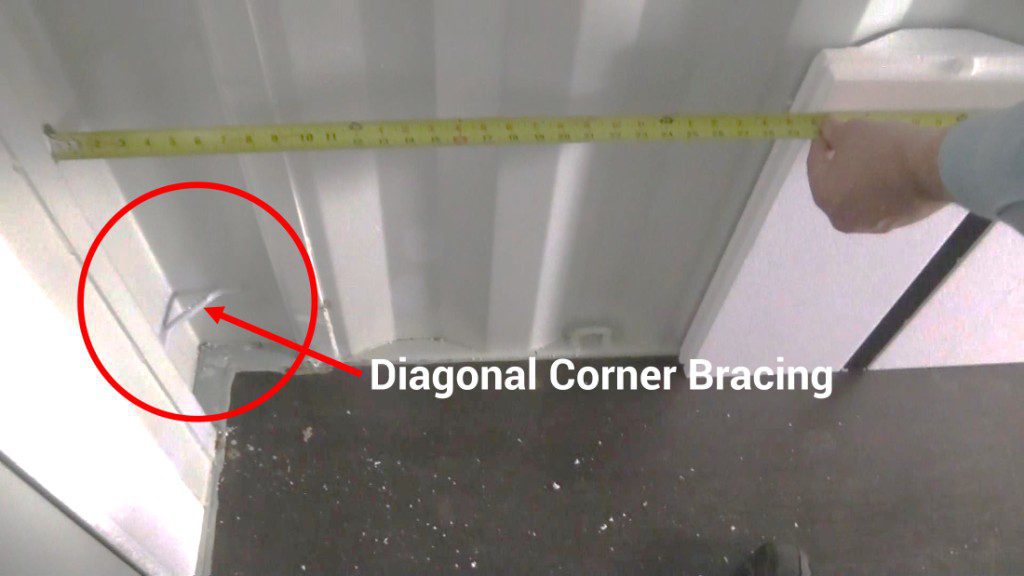
First dry fit and make any cuts or adjustment before you apply any glue. Most containers will have corner diagonal braces their height will vary, you will have to cut the large end wall corner insert to fit.

Once cut and adjusted the large end wall insert that overlaps the back wall goes in first. Apply a 3/8″ bead of adhesive at the overlapping lip and the portion of the insert that touches the sidewall.
The sidewall insert goes in next

Dry fit and make any cuts or adjustment before you apply any glue. Apply a 3/8″ bead of adhesive when placing the sidewall insert into the corner.
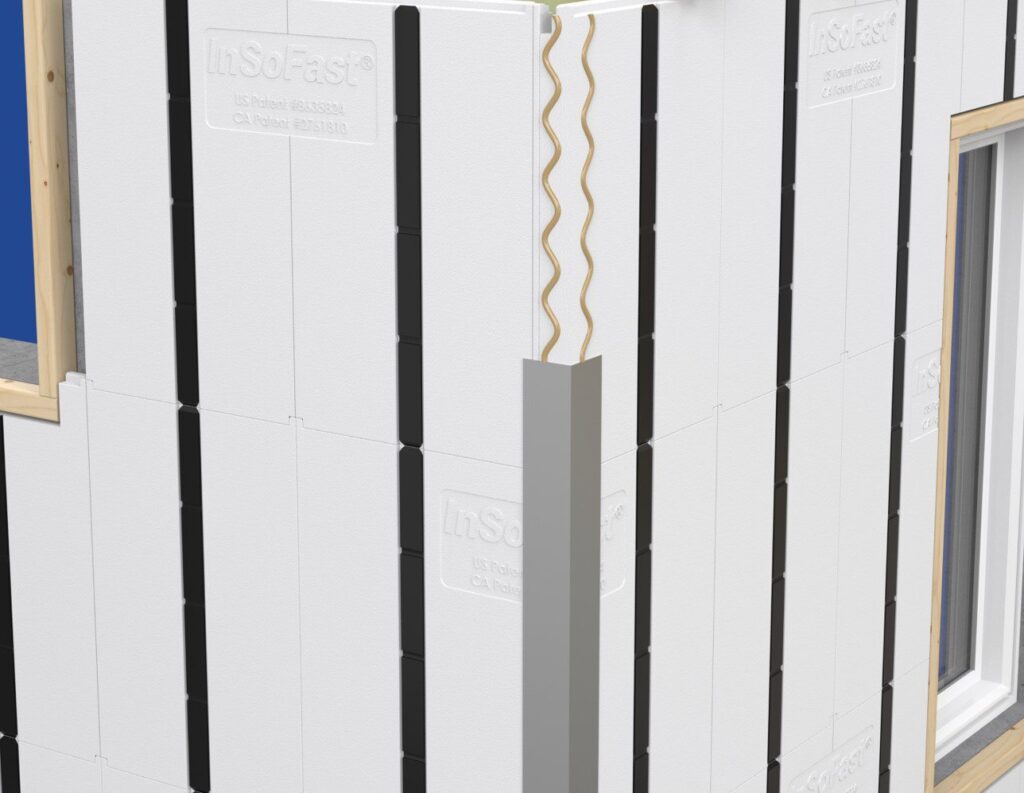
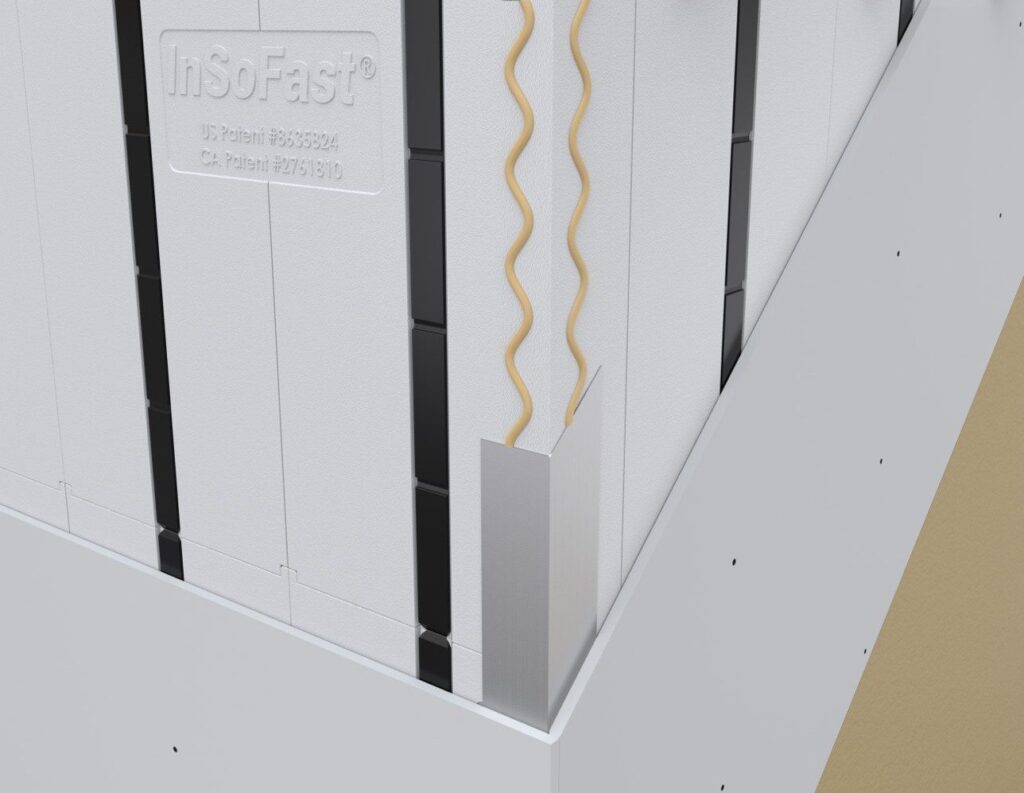
Install the metal corner channel
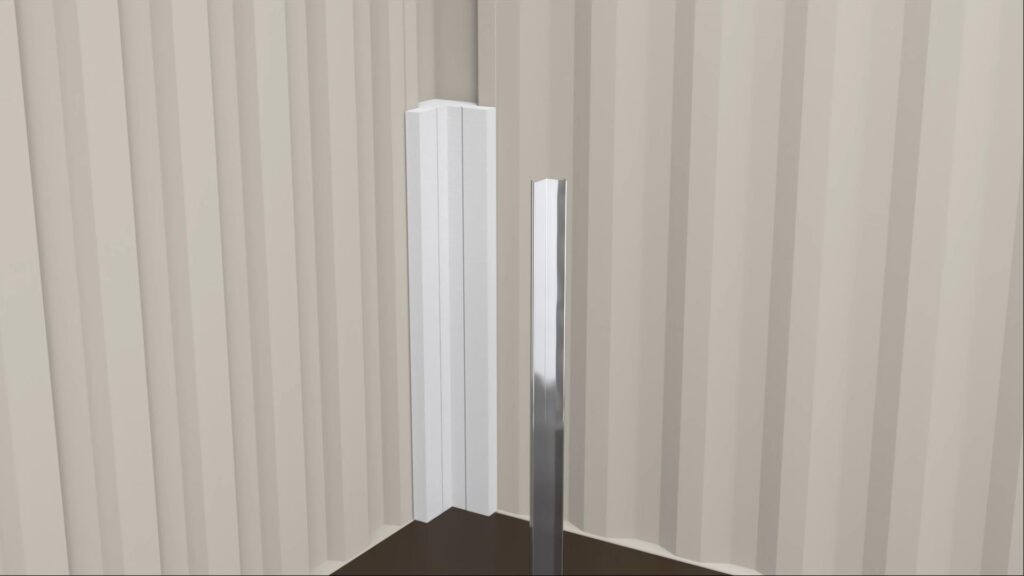
The final step is to push the metal channel into the slotted groove providing a place for screw attachment of the finishes.
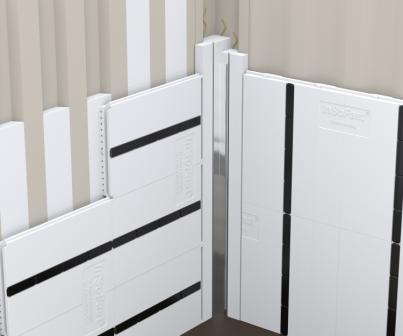
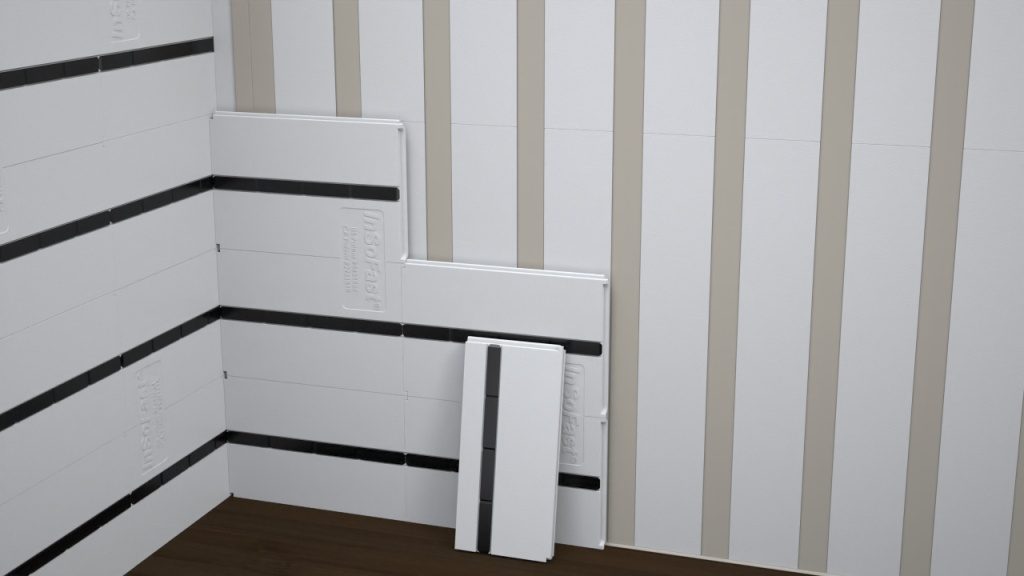
Use the cut panel reducing waste
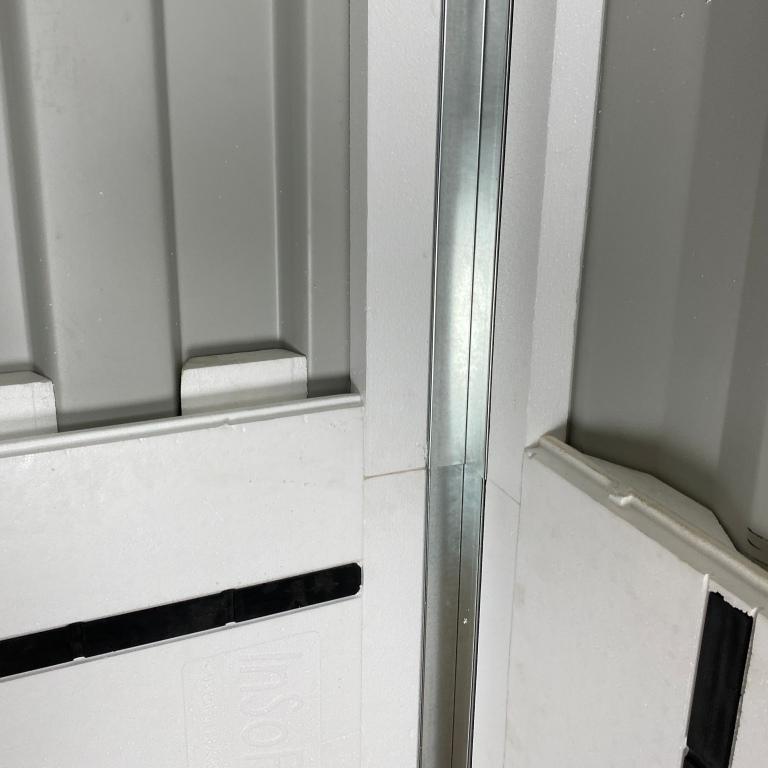
Your cut pieces from one side of the container can be utilized on the other side of the wall to off set the panels and create a staggered vertical panel joint.
Container side walls can vary slightly in length. We call this weld seam drift. Always check for proper fit and if you have a drift adjust the corner panel cut length, then adjust the panel layout accordingly.
Before you Glue
Before You Order, Before You Glue
The InSoFast CX Container Panel are designed to fit the side walls of most shipping containers. If you are unsure of the fit order a container sample. The CX panels adheres to the industry standard of 11″ on center, repeating pattern of the corrugated sidewall. Not all containers follow this pattern. The CX44 panel size is 44″ wide x 24″ high fits into this container standard module. The spacing conflicts with the US and Canadian 4′ x 8′ construction standard! The CX 44 panel’s stud spacing is 22″ on center. THIS EFFECTS the finish materials installation methods. (E.G. a sheet of drywall 48″ x 96″, 22″ on center does not divide evenly into 48 or 96.) The fastening and adhesive patterns will change and finish material waste should be considered. We have alternate methods that fit the 4×8 standards See FP-2.0RW Surfaces
First Things First
Safety Precaution: Cut out all openings in the container and complete any welding, cutting or grinding operations prior to installing InSoFast panels. Do not expose the foam insulation or plastic studs of InSoFast panels to the flames, heat or sparks generated by welding, grinding or cutting on the steel container after panels have been installed.
Dry fit and adjust your panels to fit. Use a razor blade knife to fit around cargo hooks, dents, and weld seams. Leave a 1/4″ gap to allow for spray foam sealant.
The CX panels are installed horizontally with the studs running vertically. Lay out the first row of CX panels to determine the fit to the container. Variations in the corrugations may require the panels to be trimmed or spaced out. If the panels need to be adjusted, it may be better to stack bond the panels instead of installing the panels in a running bond pattern. Place a 3/8″ bead of adhesive on the backside of the CX44 panel.
Products Required
| CX44 Panel Details | dwgdxfpdfCX44 Zip File |
| Dimensions | 24in × 44in × 2in-3 1/2in |
| Horizontal Chase | 48in × 1in × ¾in |
| Vertical Chase | 24in × ¾in × ¾in |
| Coverage | 7.33 sq-ft |
| R-Value ASTM C518 | R-11 |
| ASTM C578 Type II | Closed-Cell, injection-molded EPS |
| Canadian Standards CAN/ULC S701 Type 2 | |
| ASTM C303 Foam Density | 1.35 lbs per cubic foot |
| ASTM E96 Water Vapor Permeability | (Class III Vapor Retarder) 3.5perm/in |
| Maximum Service Temperature (long term) | 167°F = 75 Celsius (°C) |
| Co-Polymer Polyproylene Insulated Stud | Surface |
| Interlocking Edges | √ |
| Service Raceways | √ |
| Engineered for Shipping Containers | √ |
| Exterior Application | √ |
| Interiors Application | √ |
CX44 Panels in the Corners
Start by cutting the CX44 Panels for the corners
The cuts for the corners can be used on the other side of the wall.
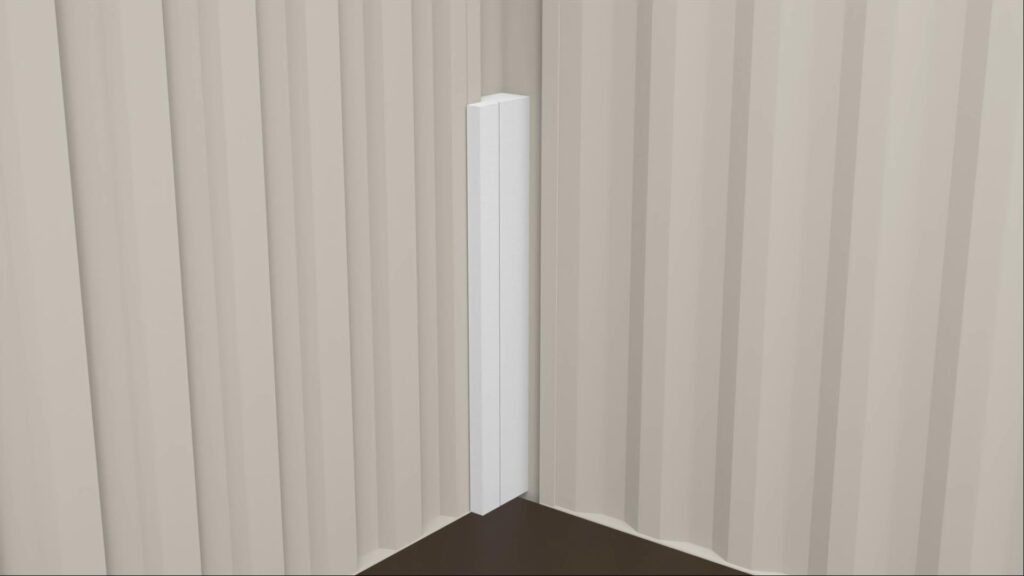
The corners should look like this when completed. Fill all open spaces/air gaps with spray foam as needed.
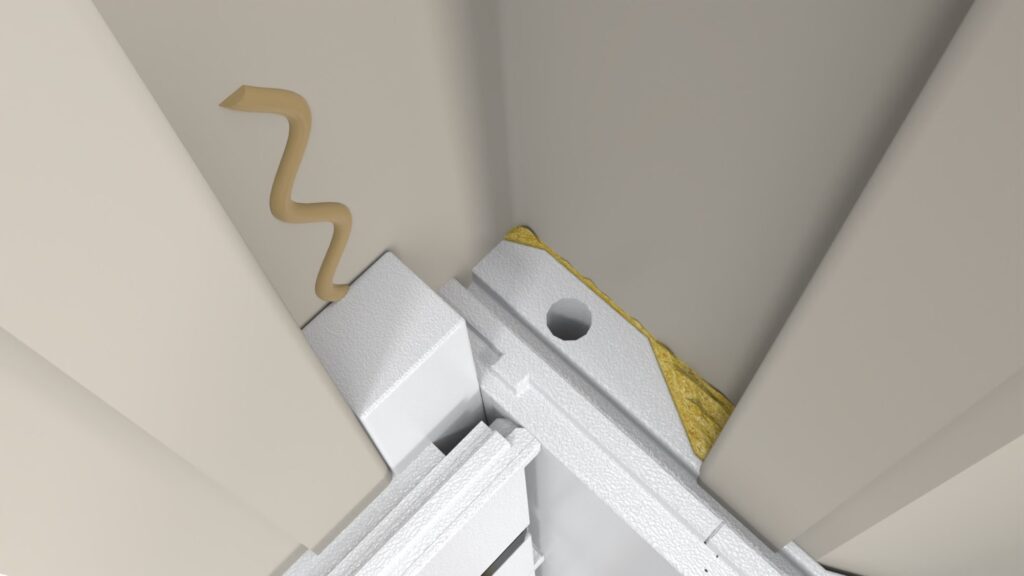
Here we used pink foam to illustrate corner fill foam by others.
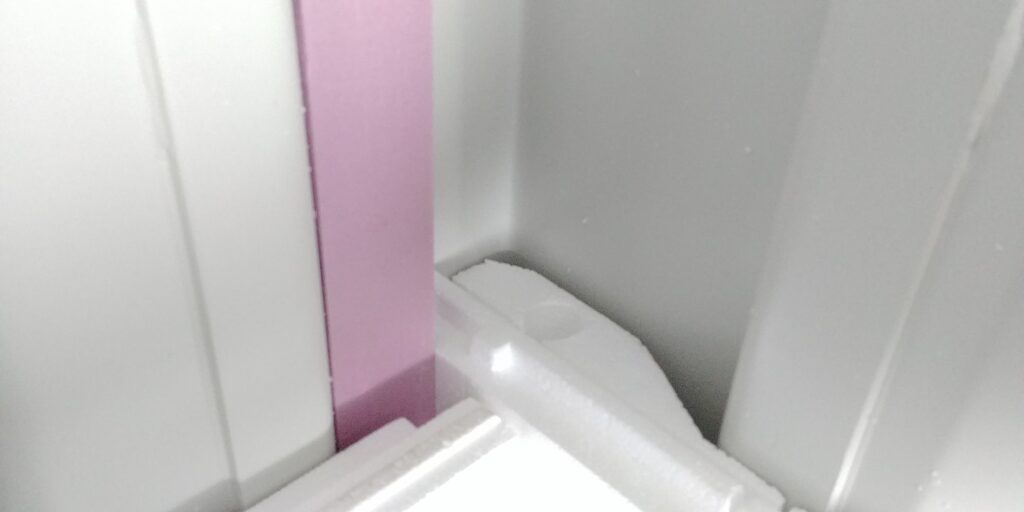
Container side walls can vary slightly in length. We call this weld seam drift. Always check for proper fit and drift and adjust the corner panel cut length layout accordingly. The end cuts and scrap can be trimmed to fit and fill changes in container geometry, glue the pieces back together.
Why we don’t have a stud in the corner
When building with a solid wall foam corner the finish material will already be supported. There is no need to panic. You can glue the finish material to the panel or glue a sheet metal angle for screw attachment.
Precaution: Do not expose the foam insulation or plastic studs of InSoFast panels to the flames, heat or sparks generated by welding, grinding or cutting on the steel container after panels have been installed. Cut out all openings in the container and complete any welding, cutting or grinding operations prior to installing InSoFast panels.
Related/Pages Documents
Sheet Metal Corner Angles for Drywall (PDF, 206kb)
Drywall, Trim, Cabinets Installation
Attaching Drywall to inside or outside Corners or prepare-corner-for-drywall. Corner angle is a multipurpose 90˚ galvanized angle used in dozens of framing applications. Available in roofing/flashing section of home improvement stores or drywall supply yards. Some of the most common applications include lapped framing conditions, offset framing, floor and ceiling runner, gypsum drywall partitions.
Place beads of adhesive on the back side of 3″ x 3″ – 25 ga. sheet metal corner angle. Press into place on corner. Hold in place with duct tape if necessary. Hang drywall using all-purpose drywall screws into InSoFast studs and into sheet metal corner angle. Install metal drywall corner bead using all-purpose drywall screws.
Panels you would need for a complete insulated CX44 Container
| Complete Container Insulation Panels; | 20′ Standard | 20′ High Cube | 40′ Standard | 40′ High Cube |
| Sidewall | Sidewall | Sidewall | Sidewall | |
| CX44 Interior Sidewall (2) Sidewalls | (20′ ) CX44-Bundle | (20′ HC) CX44-Bundle | (40′) CX44-Bundle | (40′ HC) CX44-Bundle |
| Box Total: | 9 | 10 | 18 | 20 |
| Flat Panel/Insert Endwall | Endwall | Endwall | Endwall | Endwall |
| 2.0 Flat Panel (UX) | 2 | 2 | 2 | 2 |
| Inserts: Endwall | 1 | 1 | 1 | 1 |
| Box Total: | 3 | 3 | 3 | 3 |
| Ceiling 2.0 Flat Panel-Bundle | Ceiling | Ceiling | Ceiling | Ceiling |
| 2.0 Flat Panel (UX) | 4 | 4 | 8 | 8 |
| Inserts: Ceilings | 1 | 1 | 2 | 2 |
| Box Total: | 5 | 5 | 10 | 10 |
| Door 2.5 Flat Panel-Bundle (2) Doors | Door | Door | Door | Door |
| 2.5 Flat Panel (EXe) | 2 | 2 | 2 | 2 |
| Floor 2.0 Flat Panel-Bundle | Floor | Floor | Floor | Floor |
| 2.0 Flat Panel (UX) | 4 | 4 | 8 | 9 |
| Total Box Count | 23 | 24 | 41 | 44 |
Insert and Flat Panel Installation
Before you Glue
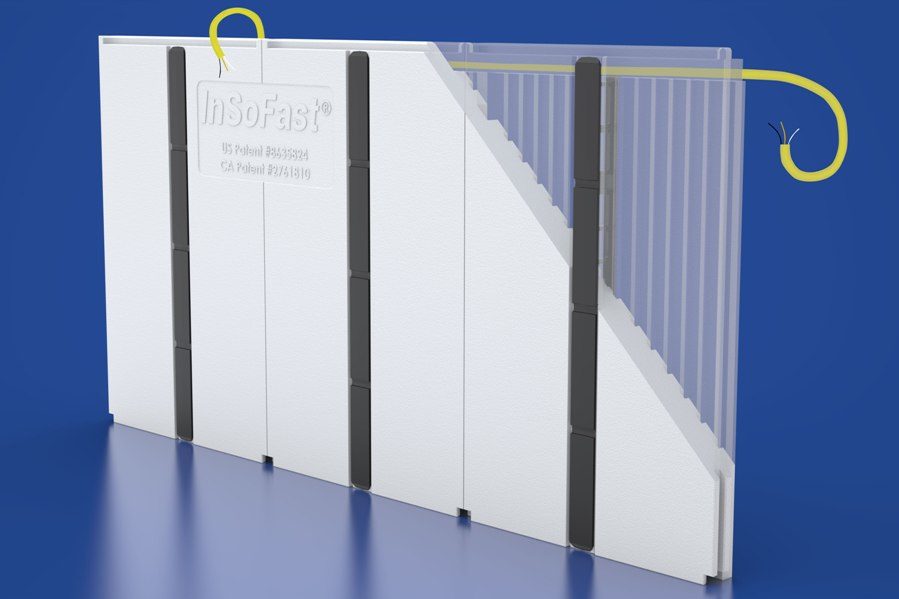
This method to finish the long sidewall of a shipping container is for interior or exterior applications. The CON-SWUX Flat panel and inserts is a two-step process insulated first with the (SWI) Side Wall Inserts to infill the wall’s corrugated voids reducing the possibility of hidden wall condensation. The UX2.0 or the EXi 2.5 Flat Panels (48″ x 24″) are installed over the inserts so that the black studs run horizontally, crossing over the container’s corrugations, providing maximum contact between the InSoFast studs and the steel container. This is the quickest and easiest method used when the container’s condition is less than optimal.
- Preferred method when modifying older containers with dings and dents.
- When weld seams are greater than or less than 44″ on center.
- Industrial fast track application.
The flat panel the studs run horizontally, 24″ wide x 48″ high this will change how you typically fasten your finishes and cabinets. This stud spacing is perpendicular to the 4′ x 8′ standard construction practices! The panel’s stud spacing is 16″ on center horizontally. THIS EFFECTS the finish materials installation methods.
First Things First
Safety Precaution: Cut out all openings in the container and complete any welding, cutting or grinding operations prior to installing InSoFast panels. Do not expose the foam insulation or plastic studs of InSoFast panels to the flames, heat or sparks generated by welding, grinding or cutting on the steel container after panels have been installed.
Sidewall Bundle Contains:
- (UX2.0 Flat Panel) or (EXi 2.5 Flat Panels) = 40 sq-ft. per box.
- (SWI Side Wall Inserts) = 30 pieces 48 inches long covering 120 lineal feet of corrugation in-fill or (15) 8′ tall sections

Install the Sidewall Inserts
The long sidewalls of the shipping container is a two step process and is insulated with Sidewall Inserts and either the UX 2.0 or EX 2.5 flat panel.
Dry fit and adjust your panels to fit. Use a razor blade knife to fit around cargo hooks, dents, and weld seams. Leave a 1/4″ gap to allow for spray foam sealant.
Place a bead of adhesive in an “S” pattern down the center of the backside of the sidewall insert. Set the inserts into the lower half of the sidewall corrugations. Once in place seal the top of the insert with a bead of spray foam. Continue to cut, fit and glue all the insert onto the sidewall corrugations. Spray foam and seal all your work.
Install either the UX 2.0 or EXi 2.5 Flat Panels over the inserts
We recommend installing panels standing on end with the embedded studs running perpendicular to a shipping containers corrugated ribs. The goal is to provide as much contact between the studs and steel in order to maximize the holding power of the studs.
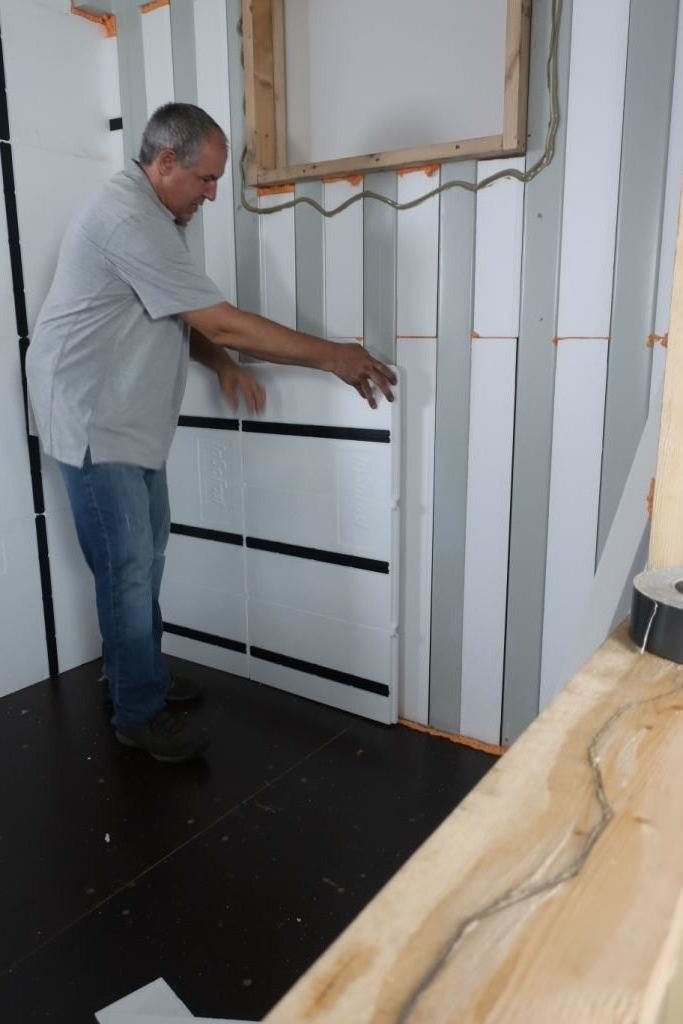
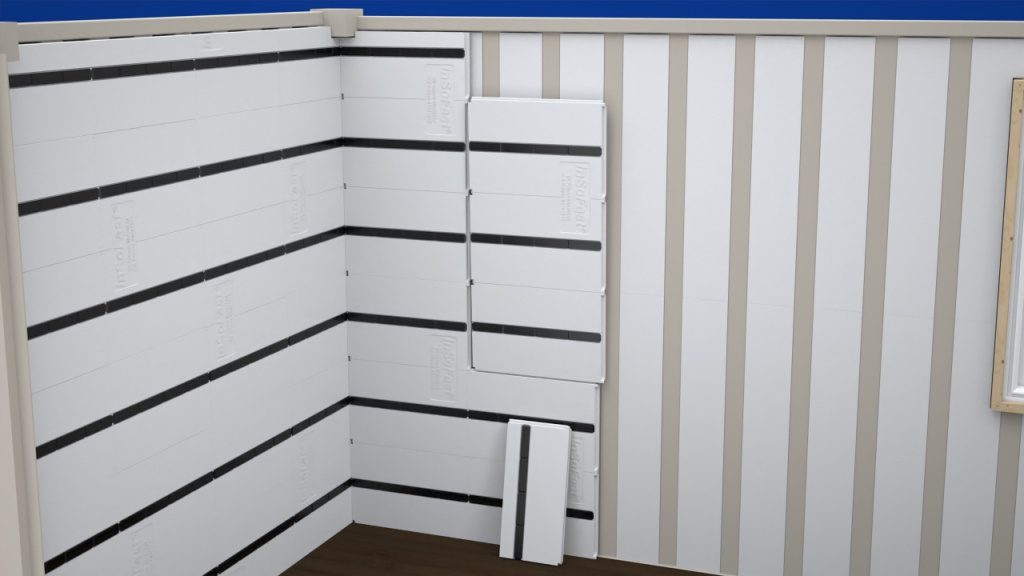
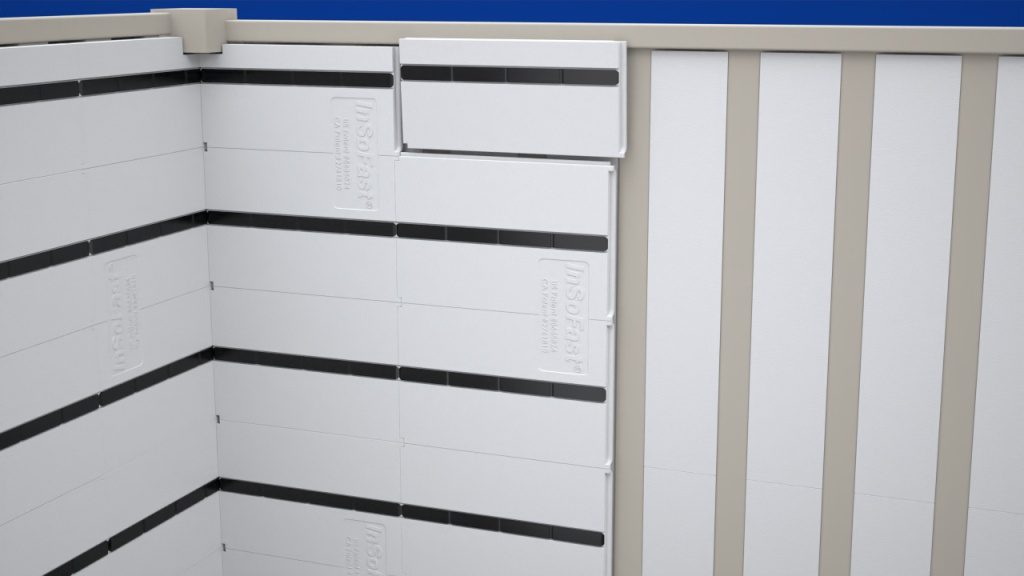
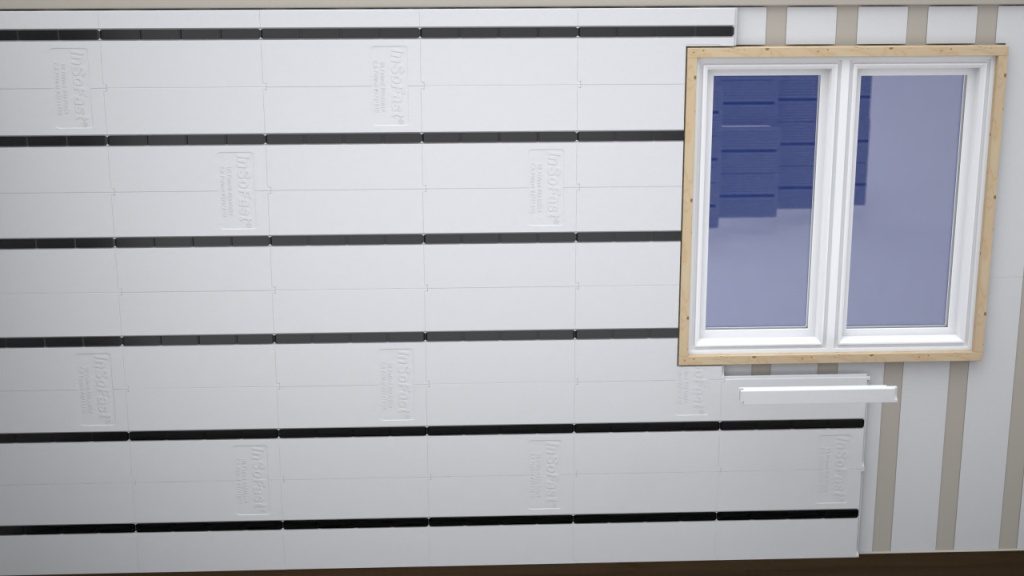
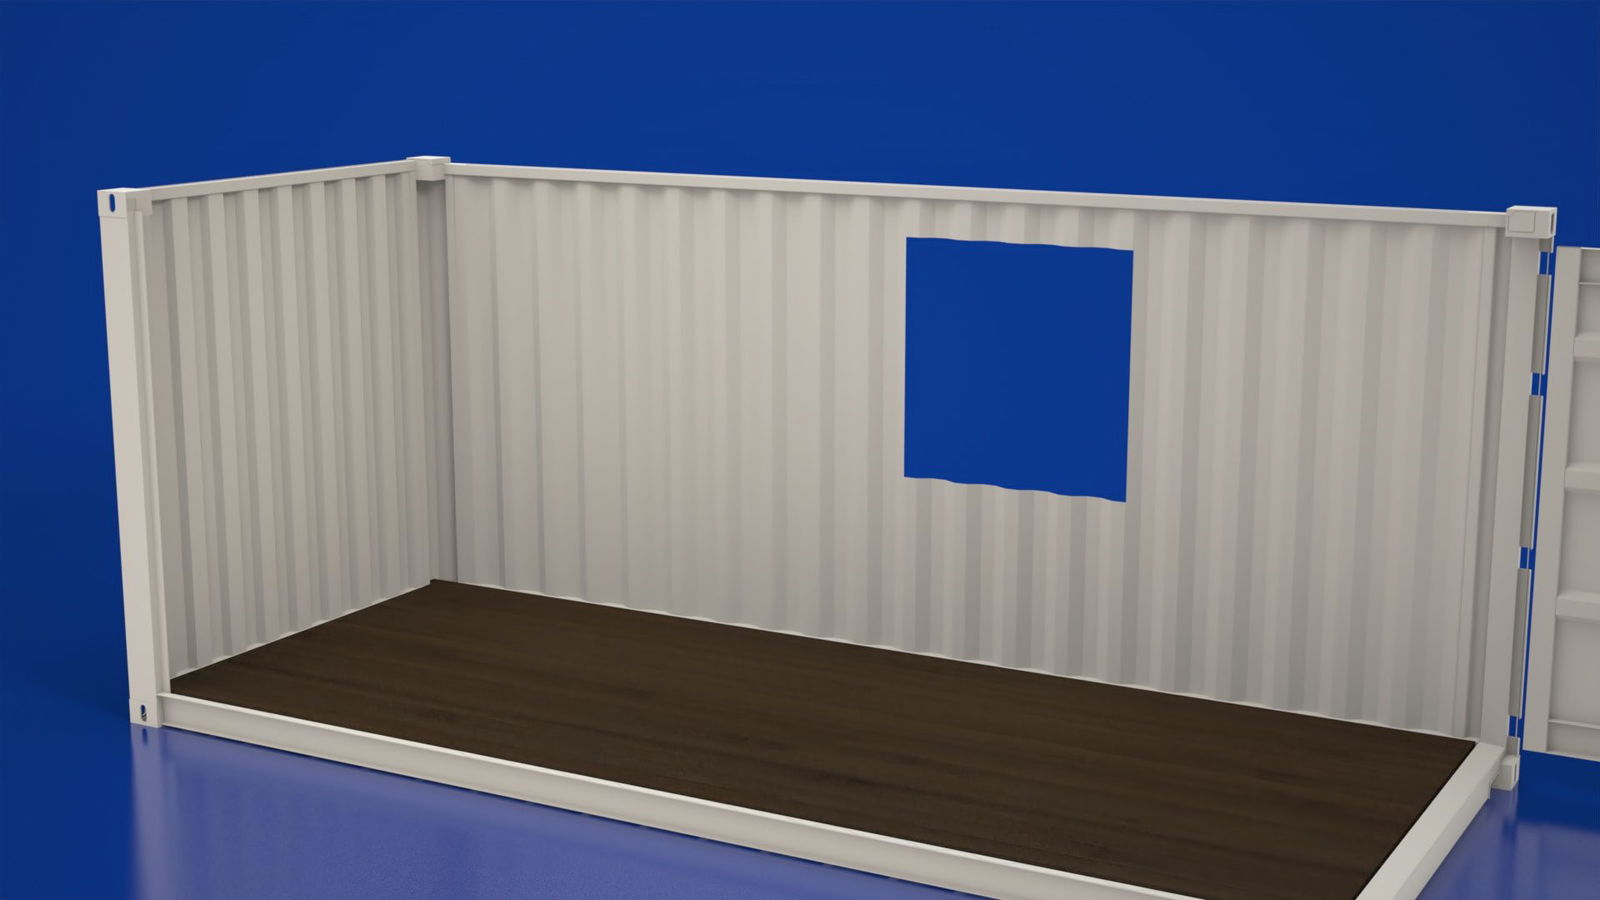
Start with a continuous bead of spray foam or adhesive along the bottom of the sidewall of the container. Add a bead of PL Premium 3x along the inside corner where the first row of panels meet the corner of the container. This seals and locks the panel in place. You may want to trim the end of the UX or EX panel to “move” the stud down closer to the floor allowing a baseboard to be attached later during the finishes section. On the back of the panel, run a 3/8″ bead of adhesive along dove-tailed ribbing of each stud.For a standard 8’ high container, the panels can be installed in a stacked method or a running bond pattern. The running bond pattern works better to eliminate waste on a 9’ high container. Use the cut off end of the top panel to start the next column.Install the flat panels in a running bond pattern, (stagger joints like brick work.) We find that this method is the best practice for the straightest flattest wall. To start the second row, cut a panel in the center with a long snap off blade utility knife. This will start the offset running bond or staggered pattern.Cut and fit the panels around the window openings spray foam and fill all the gaps. Trim away excess spray foam after it cures with a razor knife.
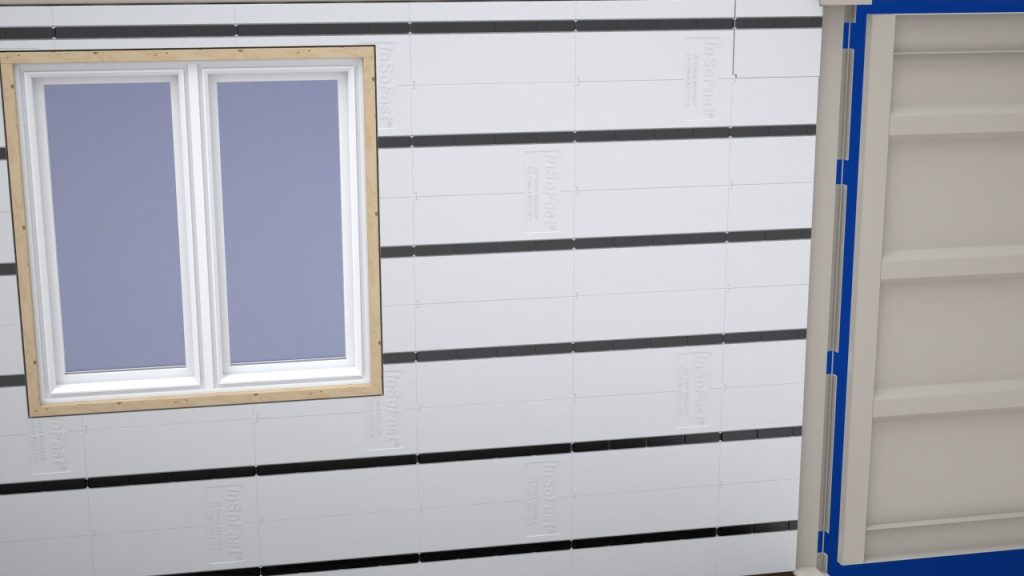

The container wall is now ready to run electrical wiring or other in wall services.
Products Required
SWI Side Wall Inserts
Side Wall Inserts
One box of Side Wall Inserts covers 112 Lineal feet of corrugation.
| Dimensioned to fit | 48in x 7 3/4in x 1 1/4 in |
| Coverage | 2.5 sq-ft |
| R-Value ASTM C518 | R-5.3 |
| Closed-Cell, injection-molded EPS | ASTM C578 Type II |
| Canadian Standards | CAN/ULC S701 Type 2 |
| Foam Density | 1.35 lbs per cubic foot |
UX2.0 or EXi 2.5 Flat Panel
UX 2.0 Flat Panels
2″ thick of closed-cell, injection-molded EPS foam body achieves R-8.5 insulation The UX2.0 is our thinnest profile panel, optimized for flat surface interior finishing. The UX 2.0 will work on floors, walls, ceiling and can be adapted for shipping container construction or other unique applications. It is a good choice as a base panel for the InSoFast PLUS when higher R-Value is needed.
EXi 2.5 Flat Panels
2 1/2″ thick of closed-cell, injection-molded EPS foam body achieves R-10 insulation. The EXi is optimized for interior finishing. The panel will work on floors, walls, ceiling and can be adapted for shipping container construction or other unique applications. It is a good choice as a base panel for the InSoFast PLUS when higher R-Value is needed.
Panels needed to completely insulate the interior
Estimating and ordering is simple measure and add together how many side wall surfaces your container project requires to complete the job. Divide the total square footage (xx) by 40 sq-ft. this will determine the number of Flat panel boxes required for your project, (round up to the whole box count). Don’t overestimate.
- One 2.0 Flat Panel (FP-2.0RW) = 8 sq.ft
- One box of 5 – 2.0″ Flat Panels (FP-2.0RW) = 40 sq.ft
- One boxes of 30 inserts 4′ long (I-SWI) – covers 13 1/2′ of the container wall 8’high)
- See Diagram.
- One side of a 20′ container would need 1 1/2 boxes of the Side Wall inserts
- One side of a 40′ container would need 3 boxes of the Side Wall inserts
Don’t overestimate, cut studs and inserts can be re-used.
| Complete Container Insulation Panels; | 20′ Standard | 20′ High Cube | 40′ Standard | 40′ High Cube |
| Complete Flat Panel Application Container; | Sidewall | Sidewall | Sidewall | Sidewall |
| Flat Panel/Inserts Sidewall | ||||
| 2.0 Flat Panel (UX) | 8 | 9 | 18 | 18 |
| Sidewall Inserts: | 3 | 4 | 6 | 8 |
| Box Total: | 11 | 13 | 24 | 26 |
| Flat Panel/Insert Endwall | Endwall | Endwall | Endwall | Endwall |
| 2.0 Flat Panel (UX) | 2 | 2 | 2 | 2 |
| Inserts: Endwall | 1 | 1 | 1 | 1 |
| Box Total: | 3 | 3 | 3 | 3 |
| Ceiling 2.0 Flat Panel-Bundle | Ceiling | Ceiling | Ceiling | Ceiling |
| 2.0 Flat Panel (UX) | 4 | 4 | 8 | 8 |
| Inserts: Ceilings | 1 | 1 | 2 | 2 |
| Box Total: | 5 | 5 | 10 | 10 |
| Door 2.5 Flat Panel-Bundle (2) Doors | Door | Door | Door | Door |
| 2.5 Flat Panel (EXe) | 2 | 2 | 2 | 2 |
| Floor 2.0 Flat Panel-Bundle | Floor | Floor | Floor | Floor |
| 2.0 Flat Panel (UX) | 4 | 4 | 8 | 9 |
| Total Box Count | 25 | 27 | 47 | 50 |
LowPro and Insert Installation
Before You Glue
Why you would use LowPro Insulated Studs
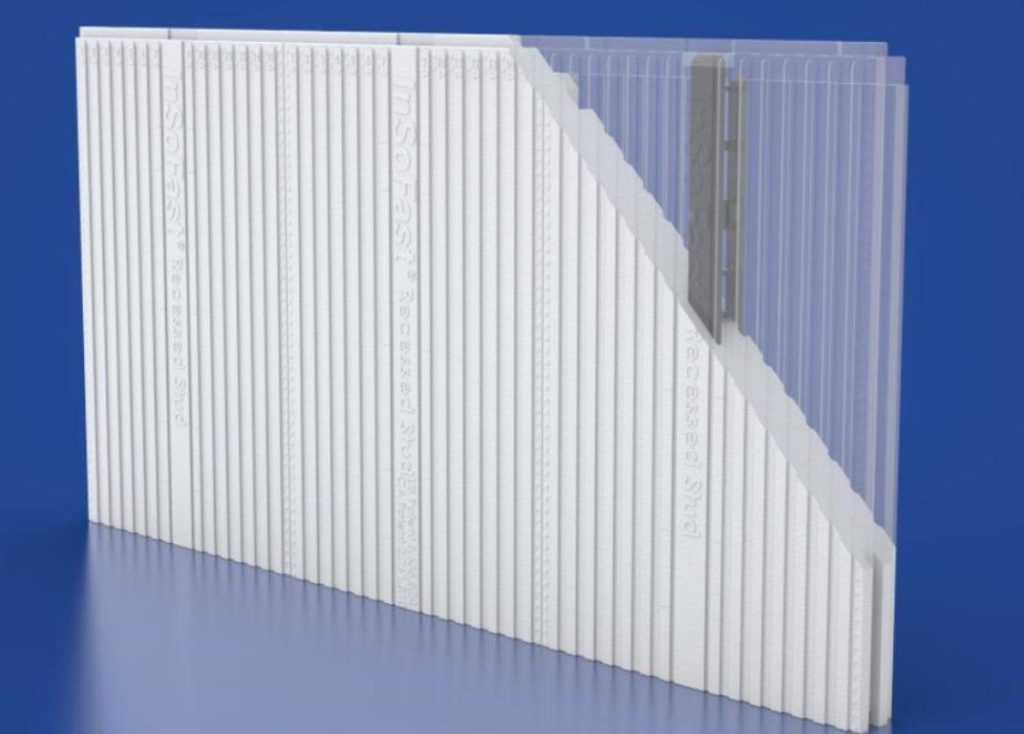
CX LowPro a hybrid solution for insulating containers. The CX-LP studs are ideally suited for intermodal container conversions where thin wall insulation and framing is the primary concern. If you are not planning to embed services like wiring in the wall. The stud are small making them easier to handle and modify around dings and dents of older containers.
Before you Glue
The LowPro insulated studs are designed for the side walls of shipping containers. The CX-LP fits into this container’s corrugations adhering to the industry standard of 11″ on center, repeating pattern of the corrugated sidewall. This spacing conflicts with standard 4′ x 8′ construction ! The LowPro stud spacing is either 11″ or 22″ on center. THIS EFFECTS the finish materials installation methods. (E.G. a sheet of drywall 48″ x 96″, 22″ on center does not divide evenly into 48 or 96.) The fastening and adhesive patterns will change and finish material waste should be considered.
First Things First
Safety Precaution: Cut out all openings in the container and complete any welding, cutting or grinding operations prior to installing InSoFast products. Do not expose the foam insulation or plastic studs to the flames, heat or sparks generated by welding, grinding or cutting on the steel container after InSoFast materials have been installed.
Dry fit and adjust your studs and inserts to fit before you glue. Use a razor blade knife to fit around cargo hooks, dents, and weld seams. Leave a 1/4″ gap to allow for spray foam sealant.
LowPro Insulated Studs Interior application
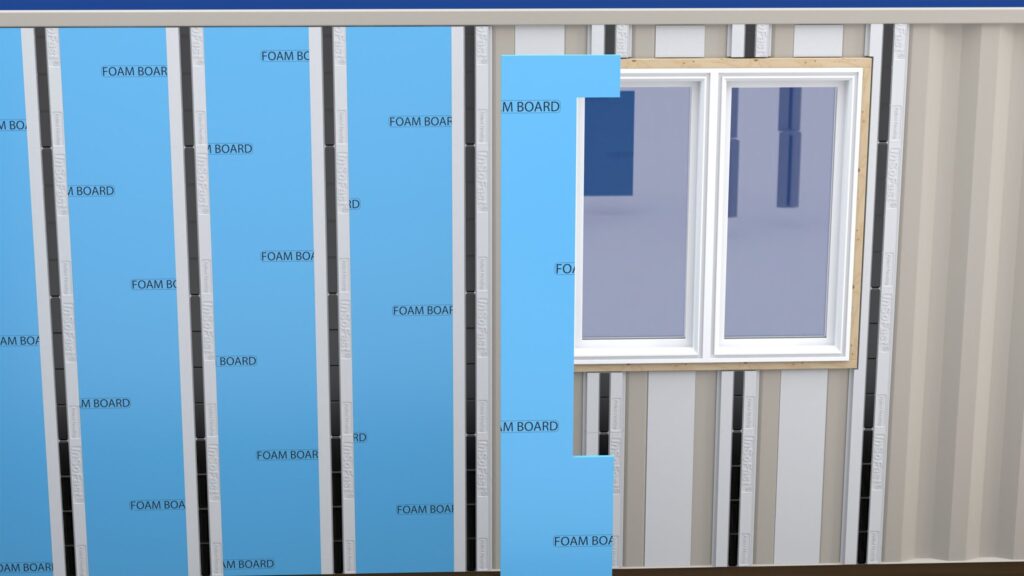
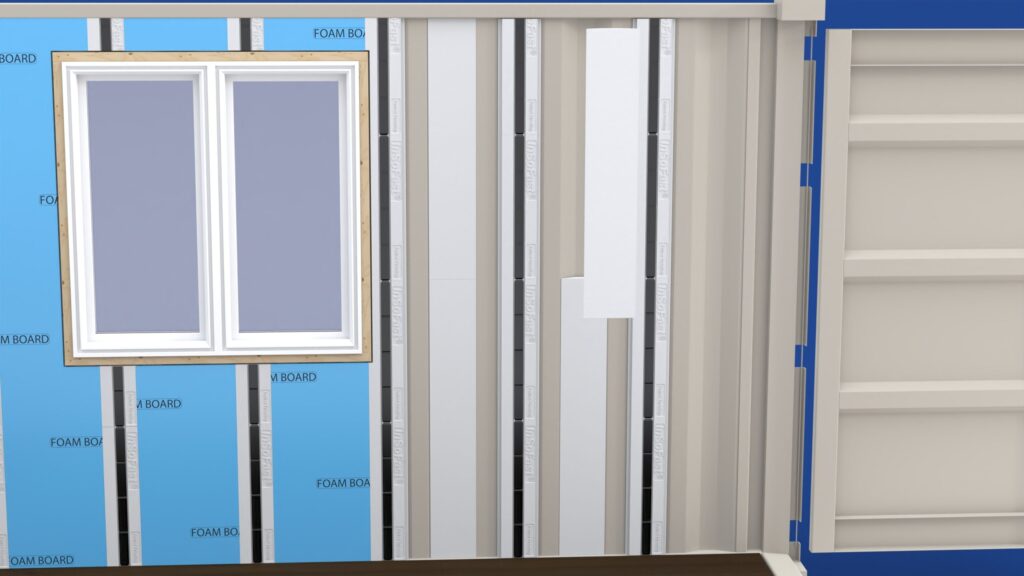
The long sidewalls of the shipping container using the LowPro Stud is a three step process and is insulated with Sidewall Inserts and locally sourced 3/4″ thick sheet foam insulation.

The adhesive applied CX-LP eliminates the hundreds of holes associated with shipping container or sea can modifications. The CX LowPro stud is part of a assembly to work with the Side Walls Inserts. The corrugation infills are typically placed on either 11 – 22 inches on center in an alternating pattern with the (SWI) side wall inserts. The CX-LP insulated infill framing is ideally suited for container conversions in commercial, residential, industrial, interior or exterior applications where thin wall insulation and framing is the primary concern. LowPro used in this configuration with 1/2″ thick drywall only 1 1/4″ of interior space is lost.
Installing the LowPro Insulated Studs
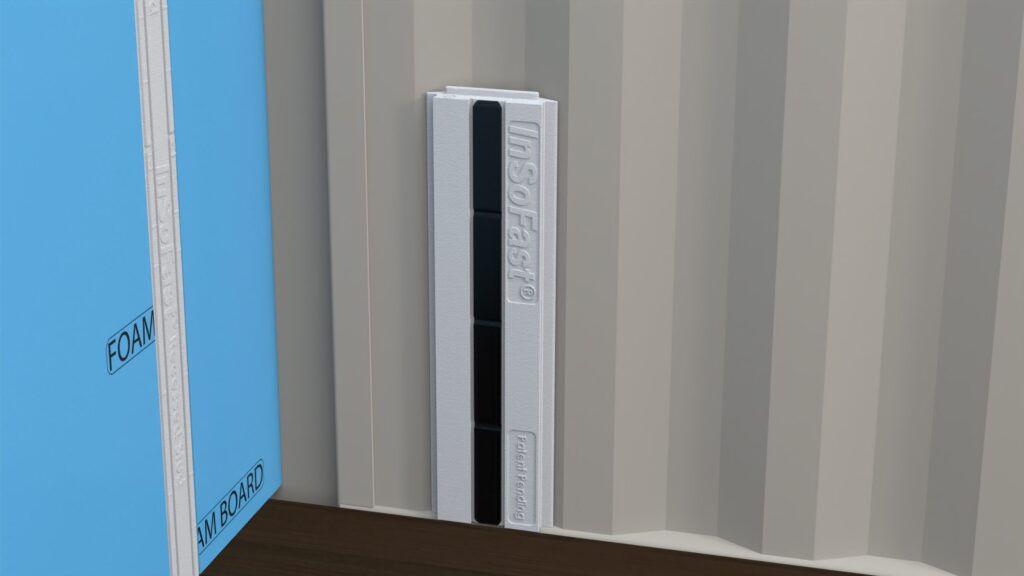
Install the LowPro Insulated StudsApply a 3/8″ bead of Loctite PL Premium 3x construction adhesive horizontally across the top and bottom then directly over the ribbed surface of the backside of the stud to form “I” pattern.
The LowPro studs can be cut to fit with regular wood working tools or razor knifes.
Installing infill insulation in the corner
Install infill insulation in the corner.
The inside corner can be filled with 1 1/2″ thick board stock insulation from a local lumber supplier. Alternatively a set of the LowPro studs or the sidewall inserts can be trimmed to fit.
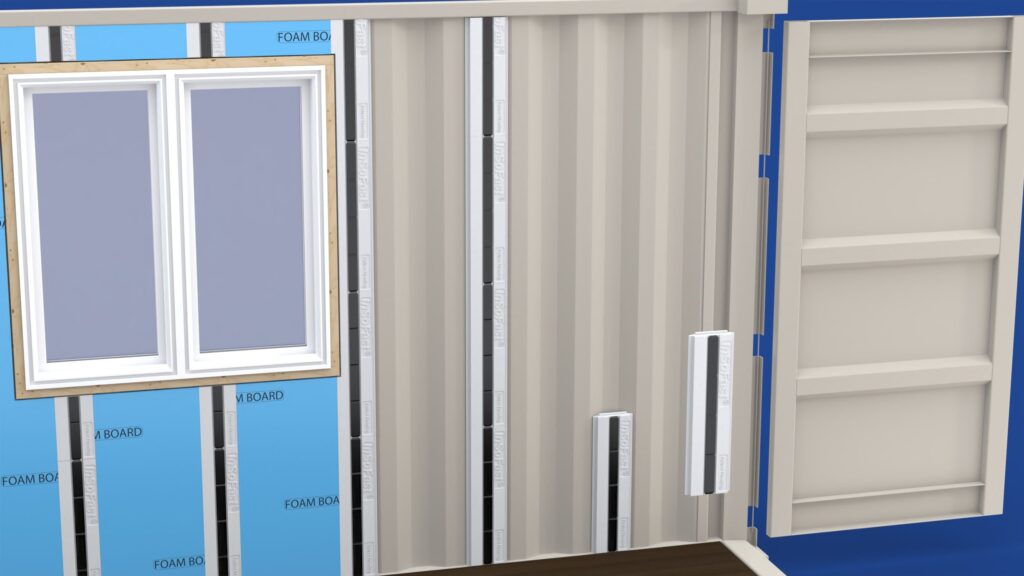
Installing the sidewall inserts
Install the sidewall inserts.
Place a bead of adhesive in an “S” pattern down the center of the backside of the sidewall insert. Set the inserts into the lower half of the sidewall corrugations. Once in place seal the top of the insert with a bead of spray foam. Continue to cut, fit and glue all the insert onto the sidewall corrugations. Spray foam and seal all your work.
Installing the the locally sourced 3/4″ sheet insulation
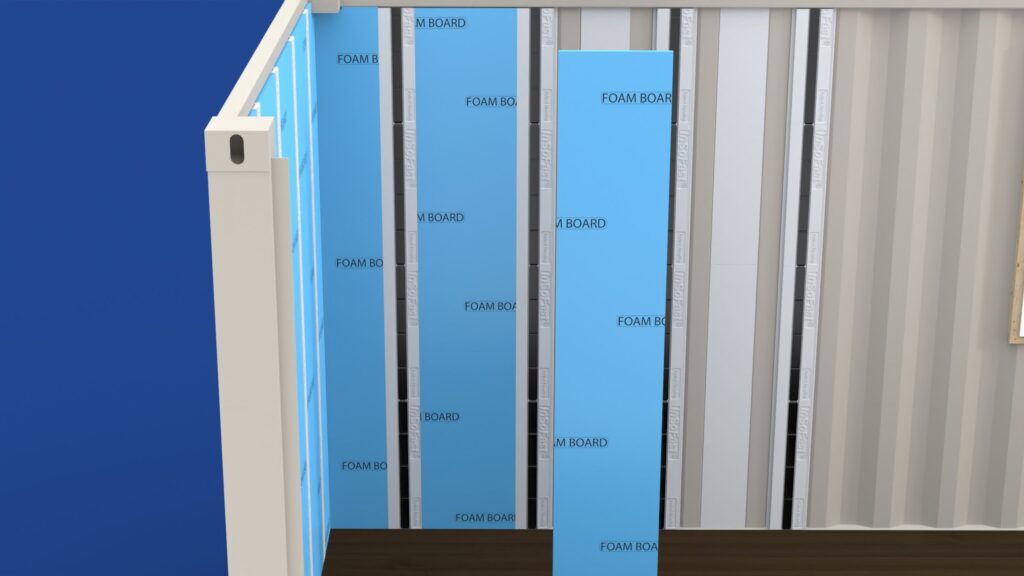
Install the the locally sourced 3/4″ sheet insulation.
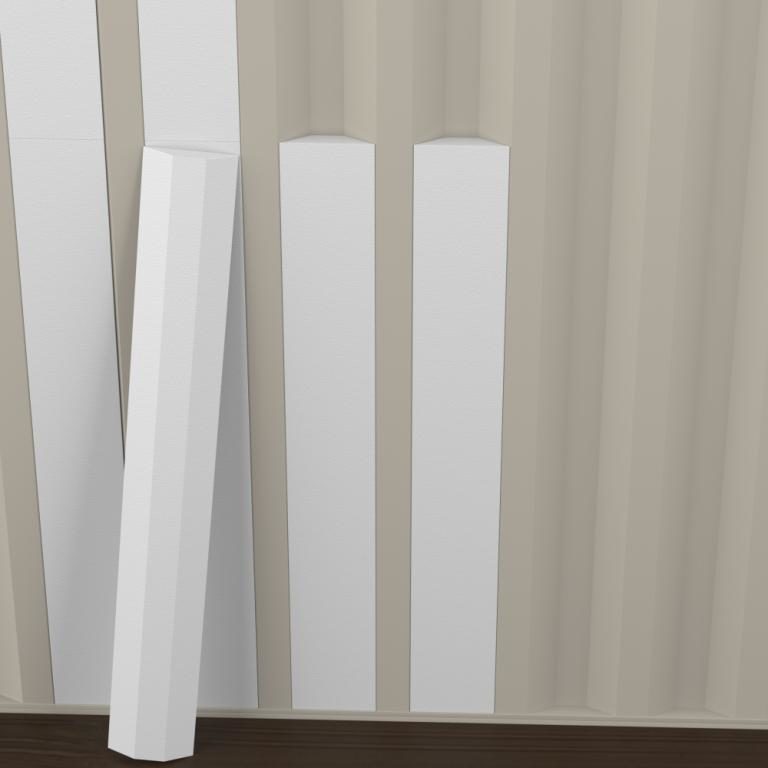
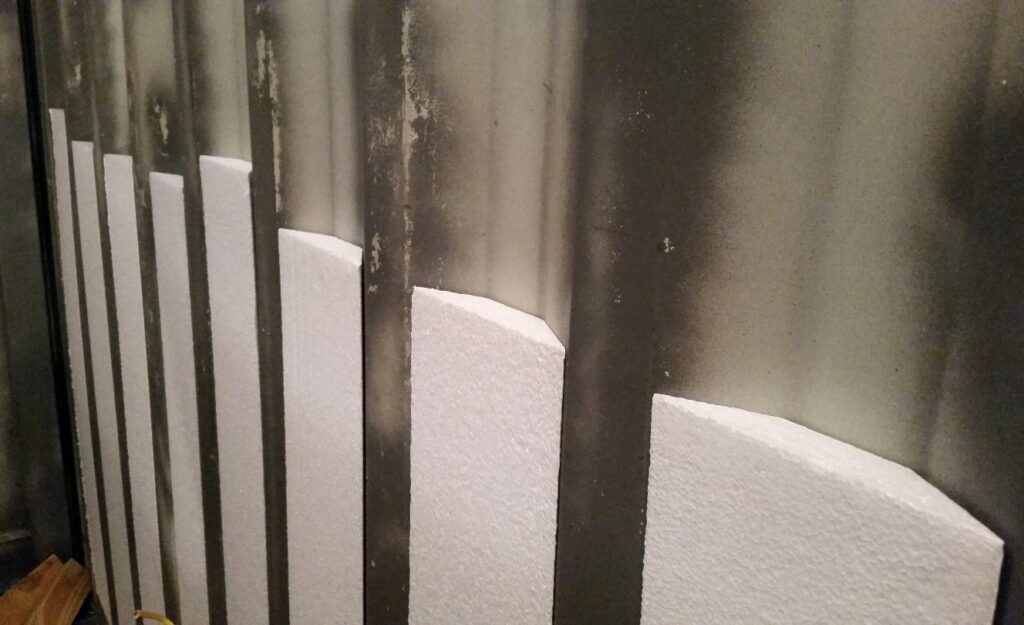
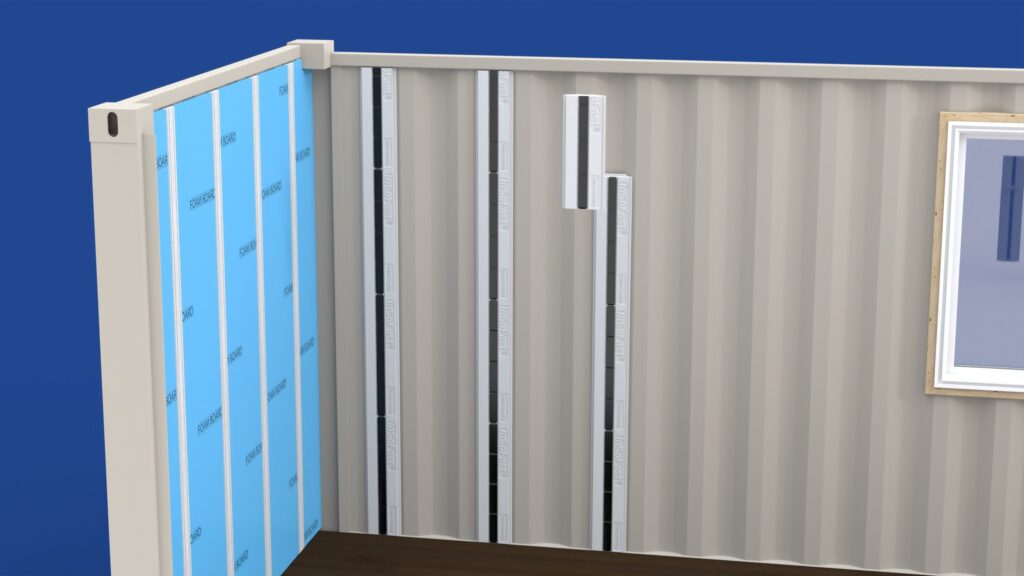
When the LowPro Studs are installed in an alternating pattern of 22″ on center, the sheet foam is cut from a 48″ x 96″ (3/4″) into 16″ wide panels.
 Insert 16” sheet foam between the LowPro Inserts. Insert 16” sheet foam between the LowPro Inserts. | 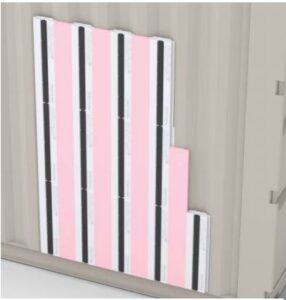 Use 5” wide sheet foam when LowPro is installed in every corrugation Use 5” wide sheet foam when LowPro is installed in every corrugation |
Optionally when the LowPro Studs are place in an alternating pattern of 11″ on center, the sheet foam is cut from a 48″ x 96″ (3/4″) into 5″ wide panels.
It is highly recommended that the 3 components be install at the same time. Once install tamp the panels with a straight edge like a 2×4 lumber to make sure that the wall is level and flat.
Cutting material to fit
Cut material to fit.
It is highly recommended that the 3 components be install at the same time. Once install tamp the panels with a straight edge like a 2×4 lumber to make sure that the wall is level and flat.
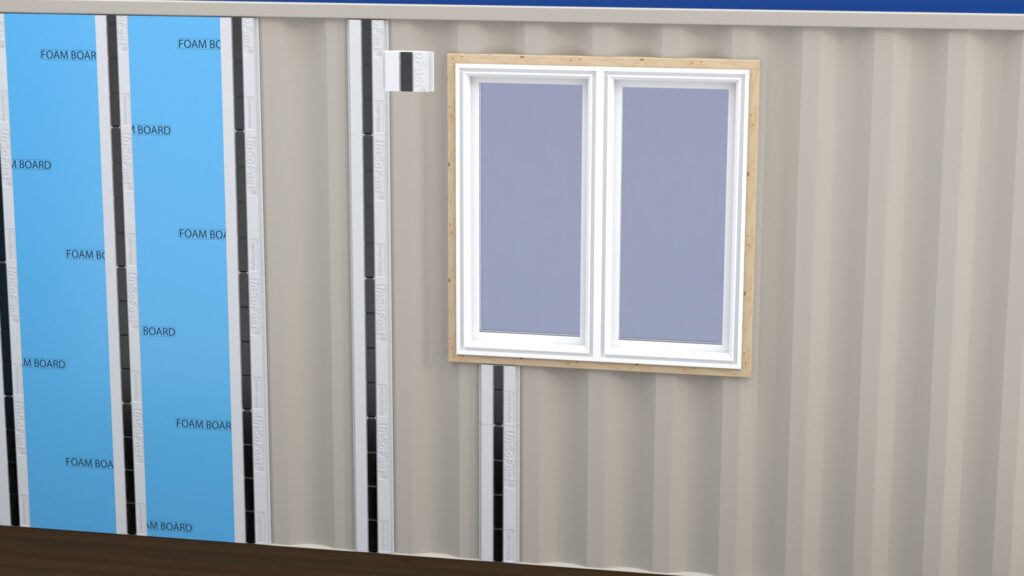
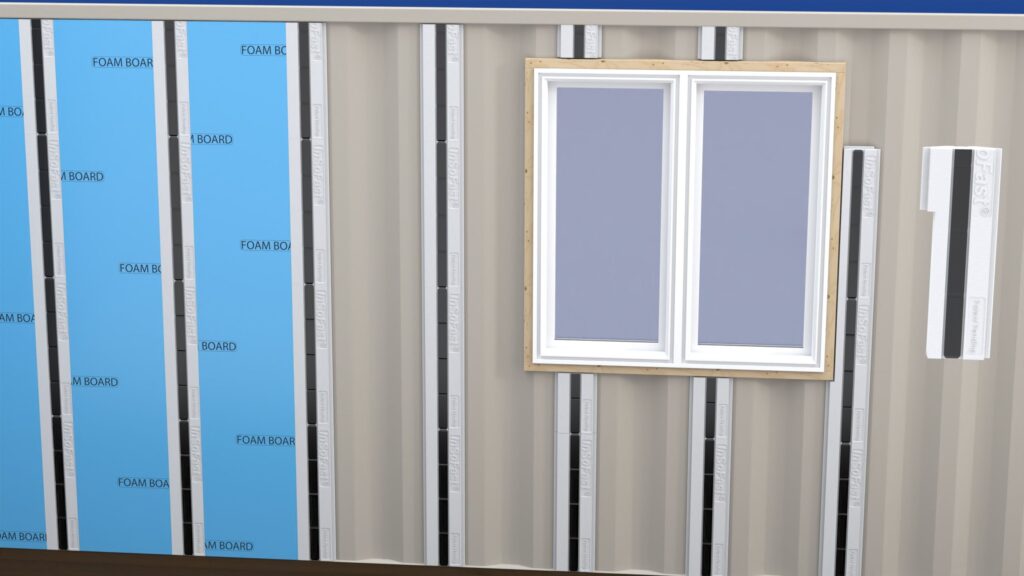
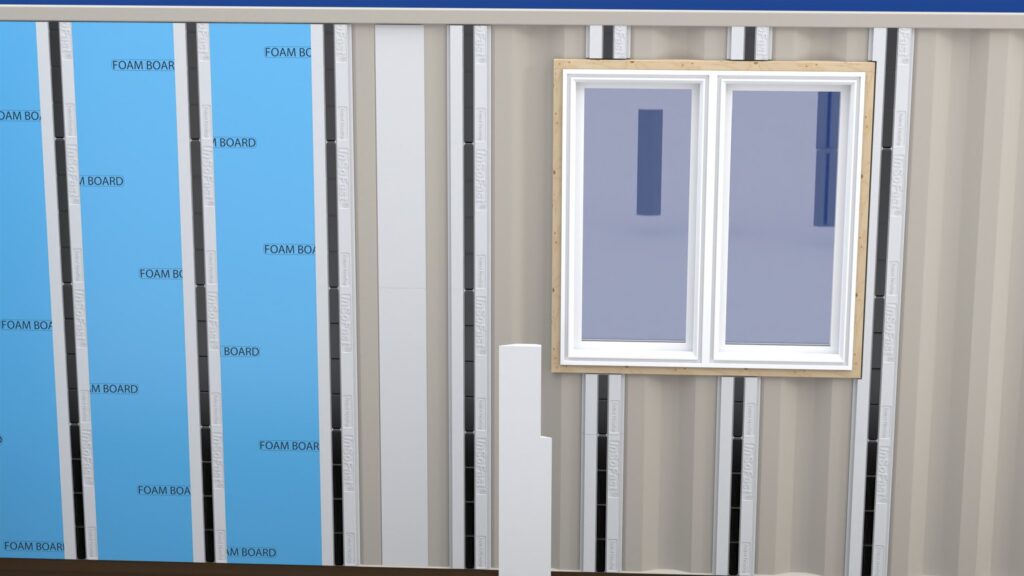
Finishing the insulation and framing
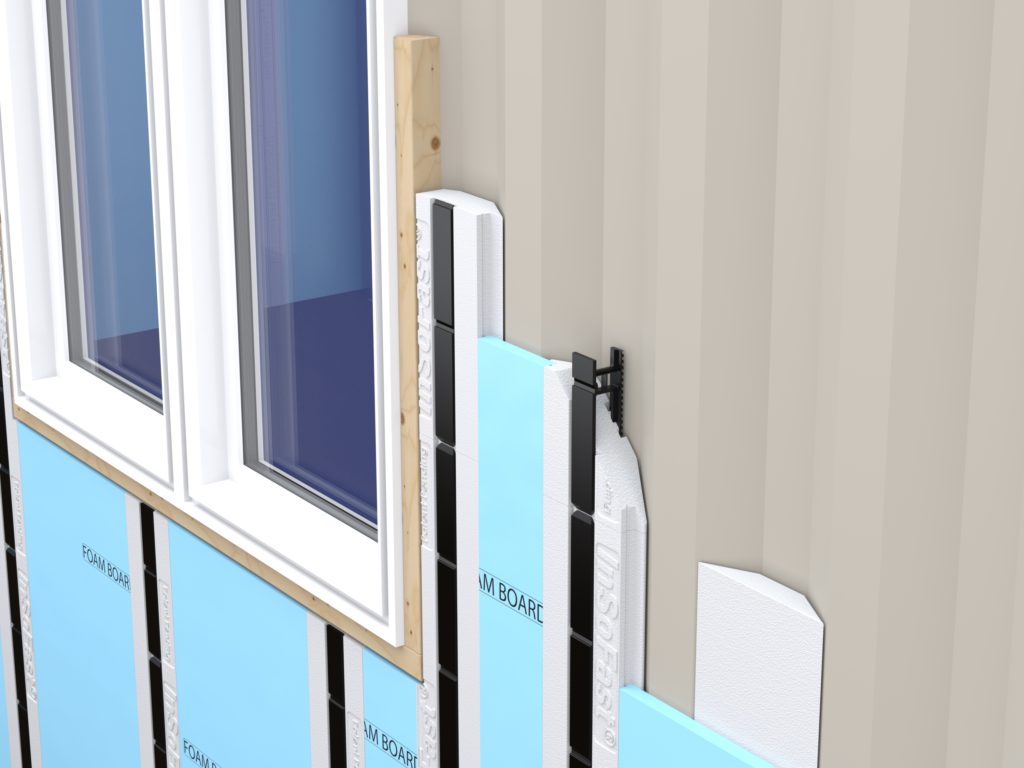
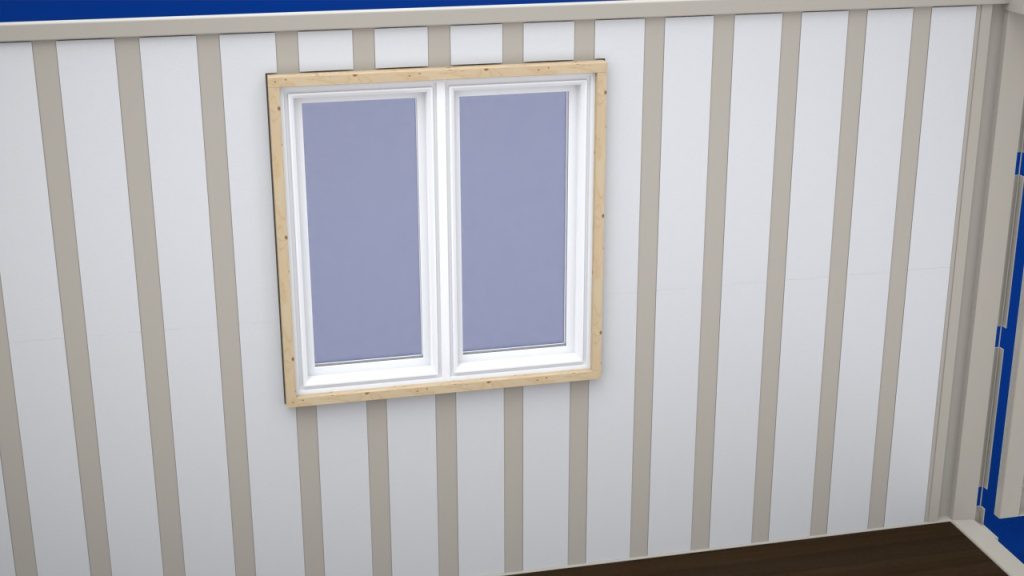
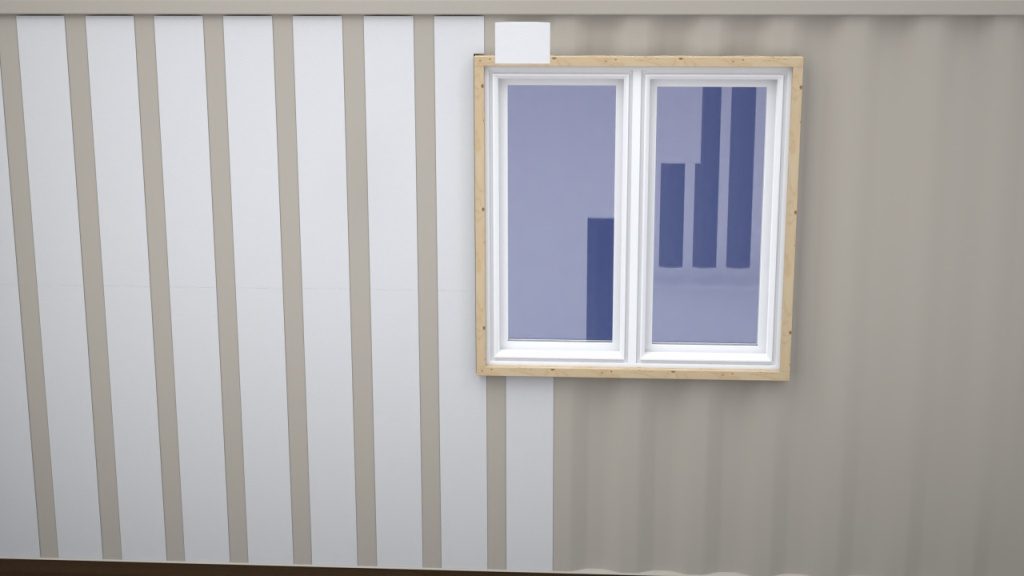
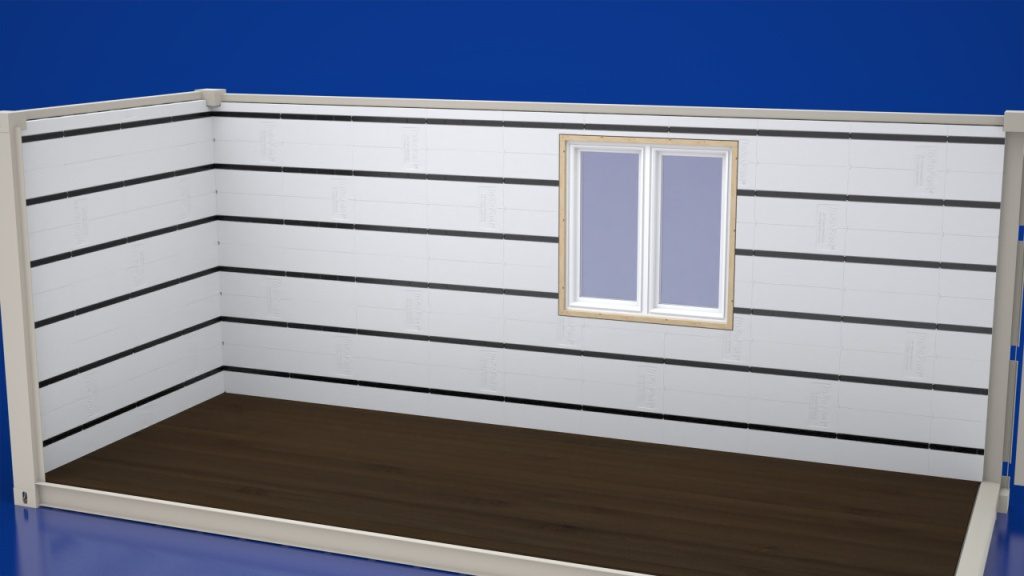
The LowPro’s versatility of traditional framing without the energy penalty of steel or wood studs. In this example the LowPro studs provide extra attachment around a window opening.
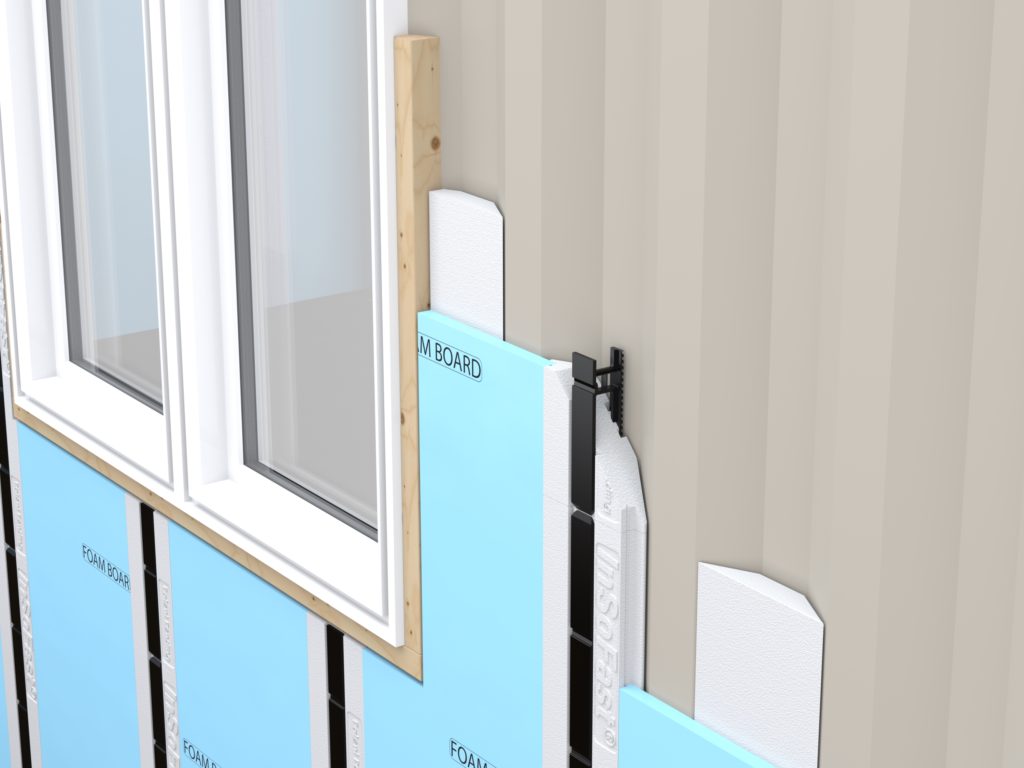
Contrasted by this example that trims out the window and maintains the 22″ on center container framing layout. Using the LowPro studs only where they are needed.

Products Required
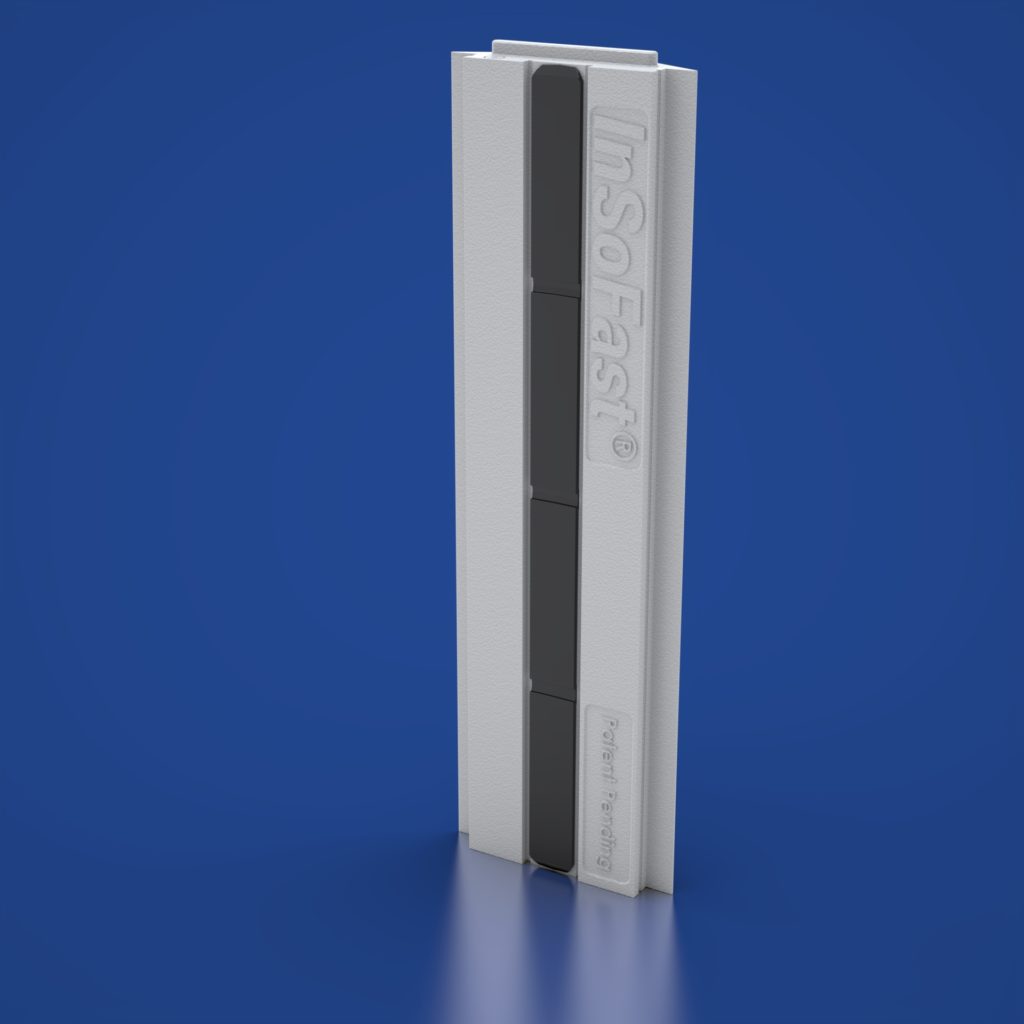
| CX-LP LowPro Insulated Stud | Side Wall InSerts | |
| CX LowPro-Side Wall Architectural Details | dwg dxf pdf | Dimensioned to fit |
| Dimensions | 7 1/2in × 24in × 2in | 48in x 7 3/4in x 1 1/4 in |
| Coverage | 2.5 sq-ft | 2.5 sq-ft |
| R-Value ASTM C518 | R-8.5 | R-5.3 |
| Closed-Cell, injection-molded EPS | ASTM C578 Type II | ASTM C578 Type II |
| Canadian Standards | CAN/ULC S701 Type 2 | CAN/ULC S701 Type 2 |
| Foam Density | 1.35 lbs per cubic foot | 1.35 lbs per cubic foot |
| Polypropylene Studs | Surface | N/A |
| Ready for Finishes | √ | √ |
| Interior | √ | √ |
| Exterior | √ | √ |
- One box of the CX-LP 46 Insulated studs will do 92 lineal feet of framing.
- One 20′ container side wall would need 44 pcs, of CX LowPros insulated studs and 20 pcs. of the Side Wall Inserts to do one side.
- One box of Side Wall Inserts has 30 pcs. that are 48 inches long or will cover 112 Lineal feet of corrugation in-fill.
- One box of the CX-LP 46 Insulated studs will do 92 lineal feet of framing.
The high-strength co-polymer plastic studs on 11 or 22-inches centers provide a positive attachment stud for finishing the container. The ribbed dovetails surface provides for adhesive applications against the metal surfaces.
Panels you would need for a complete insulated LowPro Container
| Complete Interior Insulation for a Container; | 20′ Standard | 20′ High Cube | 40′ Standard | 40′ High Cube |
| LowPro Insulated Studs/Inserts Sidewall | Sidewall | Sidewall | Sidewall | Sidewall |
| CX-LP 46 LowPro Insulated Stud | 2 | 2 | 4 | 4 |
| CX-LP 15 LowPro Insulated Stud | 1 | 1 | 0 | 1 |
| Sidewall Inserts: | 2 | 2 | 4 | 4 |
| Box Total: | 5 | 5 | 8 | 9 |
| Endwall (Container) LowPro-Bundle | Endwall | Endwall | Endwall | Endwall |
| Endwall LowPro-Kit | 1 | 1 | 1 | 1 |
| Ceiling 2.0 Flat Panel-Bundle | Ceiling | Ceiling | Ceiling | Ceiling |
| 2.0 Flat Panel (UX) | 4 | 4 | 8 | 8 |
| Inserts: Ceilings | 1 | 1 | 2 | 2 |
| Box Total: | 5 | 5 | 10 | 10 |
| Door 2.5 Flat Panel-Bundle (2) Doors | Door | Door | Door | Door |
| 2.5 Flat Panel (EXe) | 2 | 2 | 2 | 2 |
| Floor 2.0 Flat Panel-Bundle | Floor | Floor | Floor | Floor |
| 2.0 Flat Panel (UX) | 4 | 4 | 8 | 9 |
| Total Box Count: | 17 | 17 | 29 | 31 |
| Foam Board Insulation by others: | 3/4″ x 4′ x 8′ | 3/4″ x 4′ x 8′ | 3/4″ x 4′ x 8′ | 3/4″ x 4′ x 8′ |
| Sidewall | 14.67 | 16.25 | 29.67 | 31.75 |
| Total 4×8 Panel Count | 15 | 17 | 30 | 32 |