Quick Tutorial for Insulating the Rim Joist
Rim Joists let in more than Air
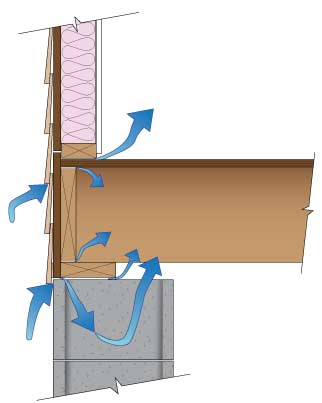
For many homes, the rim joist is one of the major sources of heat loss and air infiltration. The rim joist area above the foundation can cause more air leakage into the home than all the windows combined. The DIY project of sealing the rim joist is one of the best things that can be done to make the home more energy efficient. It is important to also seal and insulate the top of the concrete wall where the sill plate sits. It’s the simplest and least expensive basement area to insulate, and will bring the highest return on your investment.
Rim Joists let in more than Air
Spiders, bugs, and even mice find the rim joist an attractive place to enter the home. The wooden rim or band joist area is where the house’s wooden structure rests on the concrete foundation. This area is notorious for gaps and cracks.
Health Issues can Start in the Basement
A house breathes from the basement up. Typically three quarters of the air infiltration comes from the basement. The air entering or exiting the rim joist area can contain high levels of moisture, increasing the likelihood of mold growth and rot in this area. So if there are mold problems in the basement, this can affect the air quality throughout the house.
Caution: After sealing your rim joist area and eliminating air infiltration into the basement, it is important to check the combustion appliances for proper makeup air. Make sure that the appliances are not back drafting to prevent carbon monoxide poisoning.
Building Codes Related to Rim Joist Installation
If you are not planning on finishing the basement or drywalling the ceiling, building codes require that all exposed rigid foam products and spray foam products be covered with a 15 minute thermal barrier, unless it has a fire rating such as Thermax fire rated insulation board. The 15 minute thermal barrier can be achieved by covering with 1-1/2″ mineral fiber or ½” drywall glued to the foam board. Check with the local building official.
How To: Seal and Insulate Using Rigid Foam Board Insulation

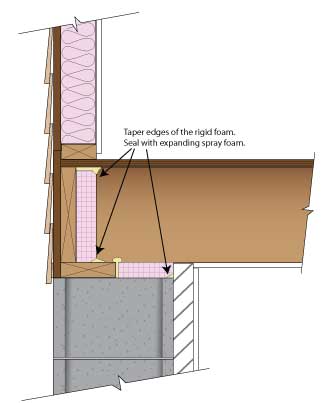
A do-it-yourself friendly method for sealing and insulating the rim joist or band joist area is to use rigid foam up against the rim joist. This method can be hundreds of dollar less than the cost of using the commercially applied spray foam. Just cut the foam board slightly smaller than the area to be sealed and finish up with expanding spray foam. This is an effective method for air sealing this area while still being easy on the pocket book.
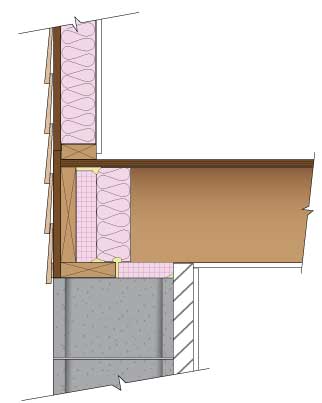
In cold, humid, or mixed climates, the foam board thickness needs to be 2″ thick to stop the condensation in the rim joist area. If the foam board is properly sealed, additional fiberglass insulation can be added to obtain a higher r-value. Because the air infiltration has been stopped, the fiberglass should not have mold problems. More moderate climates may use 1″ foam board, but please check with the local building official.

Installation Tips
Rigid foam board is easily cut with a long snap off blade utility knife. Figure on leaving a gap of ¼” – ½” all the way around. Make sure to taper the cut around the edges so that there is plenty of room to get the expanding foam around the edges. Dry fit the rigid foam board pieces.
Prior to placing the foam board in place, run a bead of expanding foam along the bottom of the rim joist cavity. Place the foam board against the rim joist and seal around the remaining edges with the spray foam. If there are problems with the board staying in place, a bead of foam board adhesive can be placed on the back side of the panel. Make sure to seal around any pipes or other penetrations with the expanding foam to provide an air seal.
Use caution with the expanding spray foam. It is impossible to remove from your hands or clothing. Use protective eyewear. If you are using the spray foam with the straw applicator, you may find it helpful to attach flexible vinyl tubing as an extension over the straw. Since the can has to be upside down to maintain flow, this makes working in the rim joist area easier.
It is best practice to install InSoFast panels right up to beginning of a rim joist and fully seal the remaining space according to its receding geometry. You can use scrap panels of InSoFast to fill in these spaces and seal any other gaps with spray foam.
How To: Seal and Insulate Using Spray Foam Insulation
How Spray Foam Works
The polyurethane spray foam is a two-part compound. Part A is isocyanate and a mixture of polyols and additives and Part B is the catalysts. The chemicals are heated and mixed at the job site as the foam is sprayed from a high-pressure gun.
Health and Safety Concerns
While spray foam is a great product, there can be some major concerns. An improperly installed spray foam job can result from not following the manufacturer’s recommendations, including the mixing temperature, applying too thick of a layer, and not following proper ventilation practices.
It is important to note when dealing with chemical off-gassing of a two part spray foam system, all occupants must vacate the building or wear proper ventilation. According to manufacturers, the ingredients are harmful at the time of application, but when cured properly it is an inert material that should not have any dangerous off-gassing.
Do not exceed 2″ of thickness in a single pass. If the spray foam is applied in a thicker layer, the chemicals may fail to cure properly and may continue to off-gas into the home.

Keeping Spray Foam Affordable
There are two way to reduce material costs. First install a layer of rigid foam insulation and cover over and seal with spray foam. Another option is to apply a 2″ layer of spray foam followed with fiberglass insulation. The spray foam provides the necessary air barrier while eliminating condensation and the fiberglass boosts the insulation value.
Do-it-yourself spray foam kits can be purchased. Extreme care must be taken with spray foam. A respirator, full body suit, gloves, and eye protection are required.
Avoid Fiberglass Insulation
Fiberglass Doesn’t Meet Current Codes for Rim Joist Insulation

Insulating the rim joist or band joist area with fiberglass insulation is no longer recommended by building professionals and does not meet current building codes for air sealing.
Because fiberglass easily allows air to travel through, it is a very poor choice for insulating the drafty rim joist area. It is almost impossible to get a proper air seal in this tight space. The recommendation is that fiberglass insulation be removed from the rim joist area and replaced with a more effective insulation and vapor barrier system.
More Fiberglass Equals More Mold
One of the main problems with fiberglass insulation is that it does not restrict air flow. Without a vapor barrier at the rim space, there is relatively warm, moist air passing through the fiberglass insulation, hitting cooler air, and then condensing at the rim joist.
Over time the fiberglass filters out the dust traveling through. When moisture is added, mold can spread throughout the fiberglass and spread to the wood due to the lack of vapor barrier. This condition is often worsened by adding more fiberglass insulation which almost ensures that the area will not dry out.


