Adhesive Attachment Methods
Architects, designers, green builders and energy conscious consumers are constantly racing for new and better ways to reduce energy usage and energy costs. Using continuous insulation is one of the most effective ways to drastically cut energy bills by bridging the thermal gaps at the studs and floor lines. However, the head-scratching problem that energy raters ignore is the through wall fastener that creates a thermal short circuit that can account for up to a 10% energy loss through the screws.
- Using adhesive to attach our panel eliminates the thermal short to zero.
- InSoFast goes beyond just “CI”. The fastener that attaches the panel is recessed ½” and insulated reducing the thermal short to near zero.
Adhesive Attachment Recommendations:
Adhesive/Glue Application
Exterior Adhesive Application Over Concrete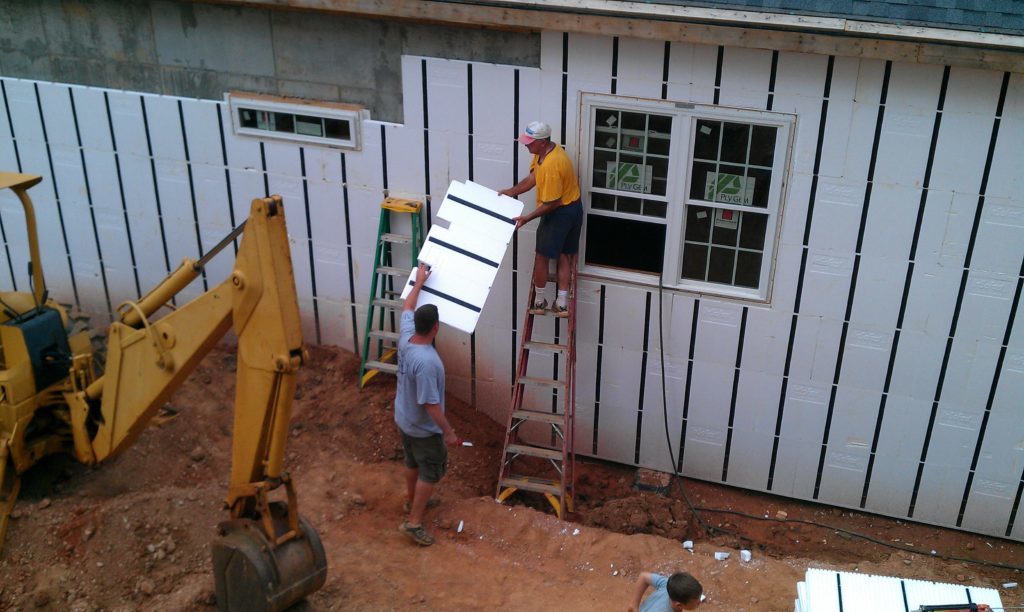
Safe and Reliable!
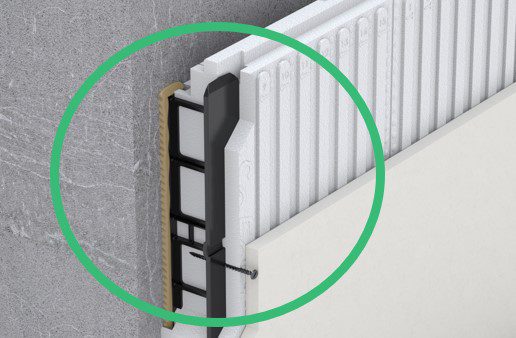
Construction adhesives is a quick and reliable method of attachment. In particular, Loctite’s 3X Stronger formula is designed to cure 3 times stronger than average solvent-based varieties. A single bead of adhesive on our stud outperforms concrete screws spaced 6 inches apart.
LOCTITE / Technical Data
Greenguard Certified Adhesive:
One of the many reasons we recommend Loctite PL Premium is it has the GREENGUARD Certification. It is important to us that you use an adhesive that has low chemical emissions, improving the quality of the air in which the products are used.
PL Premium is not a solvent-based adhesive. It is compatible with all types of foam and it’s completely odor-free. Additionally, it does not shrink as it cures. This property allows it to act as a predictable “liquid shim” which can span and fill gaps of up to ⅜-in.
InSoFast panels were designed with simplicity in mind and we would argue that gluing them is not only the easiest method of installation but often the most effective. Third-party testing has shown the adhesive bond strength of our studs to have 108psi of holding power. This means each adhered panel is capable of holding over 5,000lbs!
Testing was conducted using Loctite PL Premium’s 3X Stronger Construction Adhesive, (in Canada it is marketed under the LePage PL Premium brand,) on clean concrete surfaces. It is the only adhesive we have tested. Other formulas and brands may not work as expected.

Brand of adhesive for installing InSoFast is Canada.
Masonry Tile setting mortar
Masonry Adhesive Alternative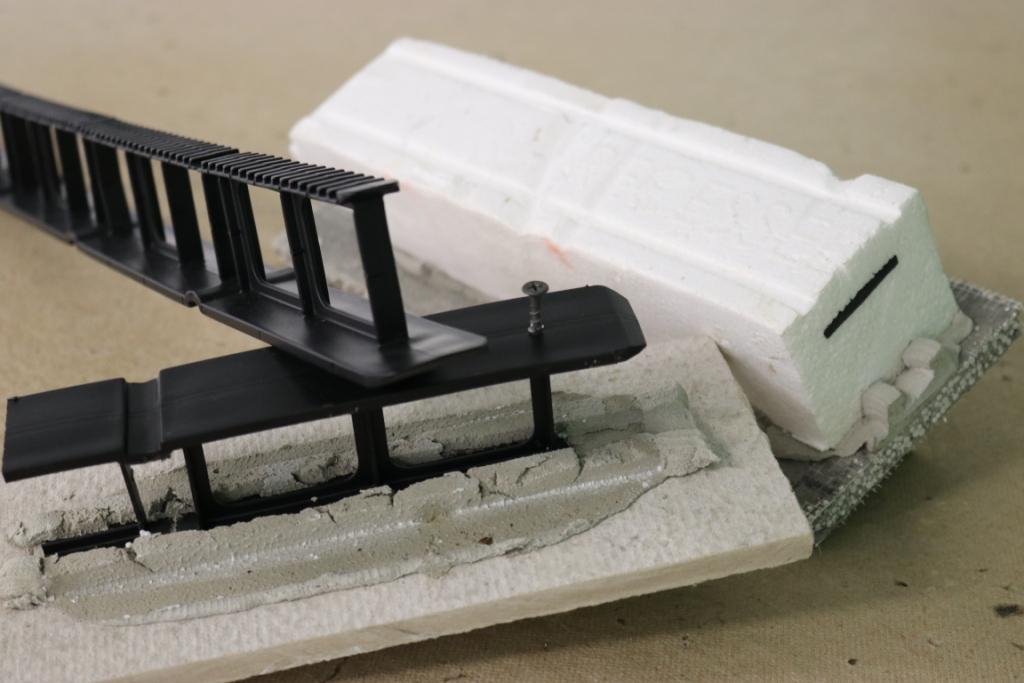
Thin set masonry adhesives can be used over masonry brick or block walls. The adhesives have a high build and can be used over rough and out of plumb walls with great results. Up to a 3/4″ bead of adhesive is applied to the dovetailed ribs on the back of the panels. Enough adhesive must be used to create that cast in place bond.

The most common method to apply the thin set mortar is with a mortar pointing bag.

Compatible adhesive/base coat data sheet for technical data and information sheet.
- Sto Primer/Adhesive 80100 is an acrylic-based material used as an adhesive. It is a two-component product to be combined with Portland cement.
- Senergy Alpha Base Coat Alpha Base Coat is a 100% acrylic adhesive and base coat that is field-mixed with Type I or Type II Portland cement. It has a very creamy texture that spreads easily.
- Dryvit Genesis High-performance, fiber-reinforced, dry mix, polymer-modified, cementitious adhesive and base coat specifically formulated for use with Dryvit system.
How do the adhesives work?
Cast in Place-Not Glued. The glue does not stick to our polypropylene stud?


If you read the adhesives manufacturer’s application information it states that the glue will not stick to polypropylene, our stud is made from polypropylene. The glue bonds to steel, wood, concrete and many other materials at many 100’s of pounds of pull-off.

The design of the dovetail glue strip accounts for this non stickiness. The polyurethane adhesive expands around dovetailed “T” strip stud and as it cures it will (harden) cast-in-place the InSoFast stud. This cast-in-place function is one of our most important patent claims.
Locks Tight
Like the name of the adhesive manufacturer, Loctite, our engineered patented stud is designed to form a tightly locked bond. When a bead of adhesive is run along the stud’s ribbing it forms hundreds of solid interlocking dovetails, a design renowned for high tensile strength. Adhesive also bypasses the structural stress associated with drilling holes in a wall.
As further assurance, we worked with a third-party independent testing facility to evaluate the power of our engineered stud/adhesive bond. The astounding results concluded the safety factor at over 400 times the weight of standard ½-in drywall. Most structural beam systems are engineered to a safety factor of only 2-3 times their rated loading.
Application Process
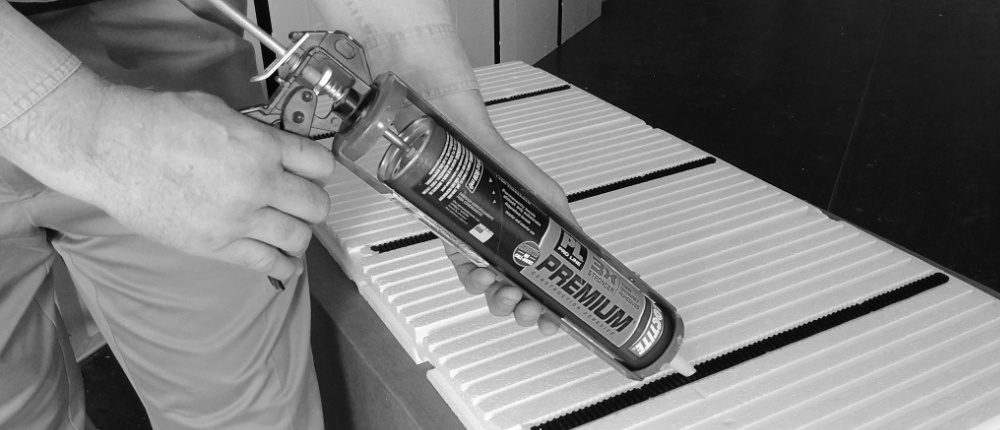
1. Find the Ribs
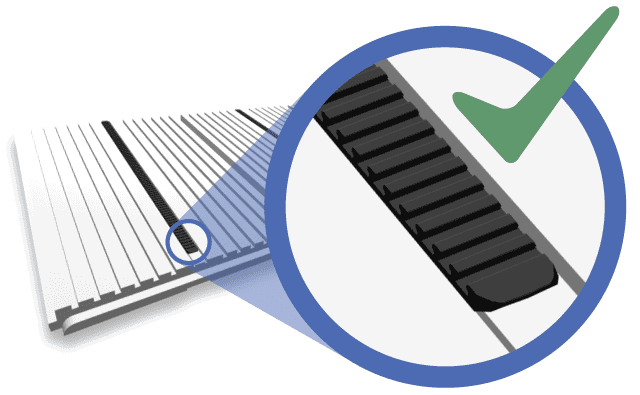
Make sure you are gluing the ribbed side of the studs.The front side is smooth and will not form a strong mechanical bond with the adhesive.Quick Tip: You can speed up your installation by pre-stacking the panels with rib-side facing up, ready for adhesive.
2. Apply Adhesive
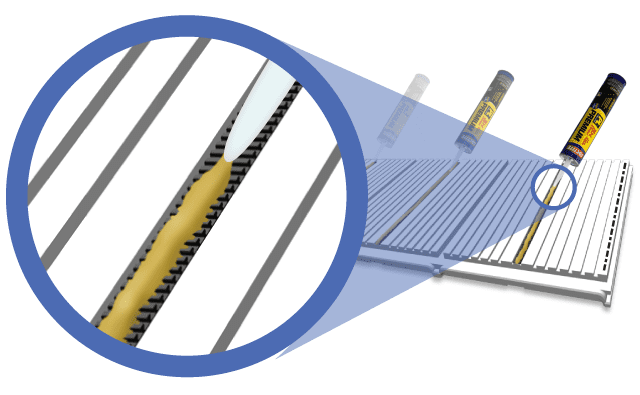
Run a ⅜-in bead of adhesive along all 3 studs.If you are placing the panel on the edge of a wall or in a corner, run a bead directly on the foam at that edge (see: dashed line). This will ensure a solid-backed attachment. Again, it is only necessary at corners and anywhere you cut a panel to fit around openings.
3. Press in Place
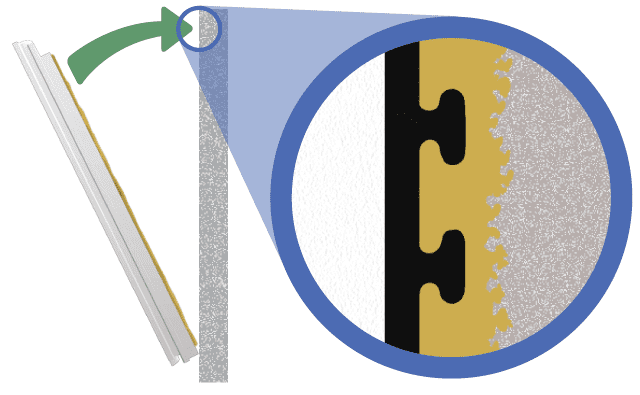
Check that your panel is tongue-side up, with the rib-side facing the wall and that any interlocking edges meet. Press firmly against your wall.Don’t be alarmed if it feels a little spongy at first. PL Premium takes about 20 minutes to set and 24 hours to cure. It can form a “liquid shim” spanning gaps of up to ⅜-in and effectively tighten up small irregularities in a wall’s surface.On walls that are subject to peeling or flaking paint, it is important to supplement the installation of InSoFast panels with mechanical fasteners such as Tapcon® screws or Perma‐Grip nails.See: Installation – Screws and Fasteners
How to estimate Loctite adhesive quantity
Calculate the number of tubes necessary for your project (adhesive coverage may vary):
- 1 large 28-fl oz / 828 mL tube = 6 InSoFast Panels or
- 1 large 28-fl oz / 828 mL tube = 48-sq ft of wall area
Rough estimate for 28 ounce tubes of adhesive required for:
| LOCTITE® PL PREMIUM® | ||
| Square Feet | InSoFast Boxes | PL 3x |
| 800′ | 20 | 16 |
| 1200′ | 30 | 24 |
| 2000′ | 50 | 40 |
| 3600′ | 90 | 72 |
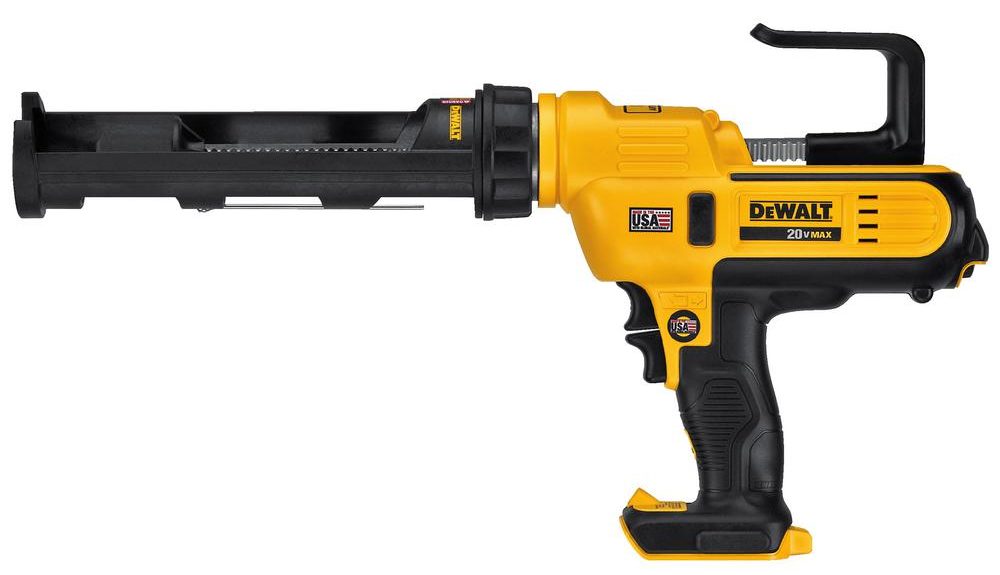
When purchasing the adhesive for your project, we recommend using the larger 28-fl oz / 828 ml tubes and a caulk gun to match in size. For larger projects, get a higher-quality caulk gun that’ll be easier to operate and give you more control with the flow of adhesive. You’ll thank yourself later. Quality guns usually have a built-in tip cutter and seal puncture tool.
Estimating adhesive has variables beyond our control, the condition of the wall, and how accurate the tradesmen is with a glue gun? The adhesive manufacturer’s technical sheet states, “A 3/8” (9.5 mm) bead extrudes approximately 38 ft. (12 m).“
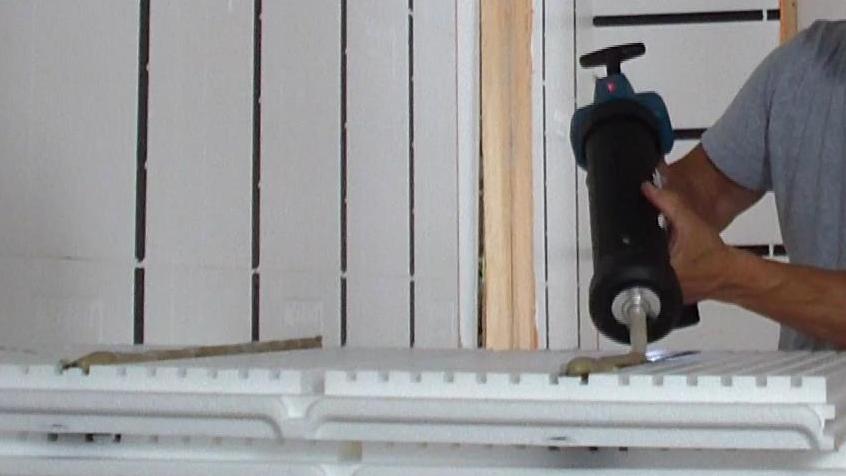
That is in a perfect world. When PL Premium 3x adhesive is applied a ⅜” bead on the backside of the stud’s ribbed surfaces roughly equates to 7 InSoFast panels or 56 square feet of adhered wall.
The adhesive follows the “Goldie Locks Rule,” too much, too little, and just right. Doing just right you can expect that 1 large 28-fl oz tube will cover 21 of our studs (3 studs per panel for 7 panels).
Other considerations additional adhesive should be included for securing the panels at openings like windows, doors and corners.
1 large 28-fl oz / 828 mL tube = 21 (22″ studs) or 7 panels for 56 Square feet of glued InSoFast wall surface.
- We recommend that you estimate approximately 10% waste or
- 1 tubes of the adhesive = 50 Square feet of wall.
To verify that enough adhesive is used, press the panel into place. Pull the panel back and check to see if the adhesive has spread out beyond the full width of the stud. It is normal for the panel to “float out” from the side of the wall when it is accommodating irregularities the adhesive will bridge gaps up to 3/8″. Additional adhesive may be necessary in some areas.
Do I have to test the adhesive to see if it will work on my wall?
If you are unsure about the conditions of your walls, we recommend performing an adhesive test. Find a scrap 2×4 measuring at least 6 inches long and run a 3/8-inch bead of adhesive along it. Press the “test block” against the wall with one end resting on the floor to keep it from sliding down. Support it in place if necessary. You’ll need to wait 24-48 hours for the adhesive to cure, but keep in mind that PL Premium takes 14 days to reach its full strength.
When the curing time has passed you are ready to test the strength of the bond. Try to pry the test board off the wall. If you can manage to pull it off with your hands, you will need to mechanically fasten the panels to the wall.
See: Installation – Screws and Fasteners
When you begin your InSoFast installation, check to make sure you are using the right amount of glue. Pull back a freshly adhered panel and check for adhesive transfer to the wall. You should see about 1/2-inch wide adhesive transfer to the wall.
Do not install screws or mechanical fasteners until the adhesive has completely cured. (usually about 24hrs)
Important Notice: Surface Temperature Applications
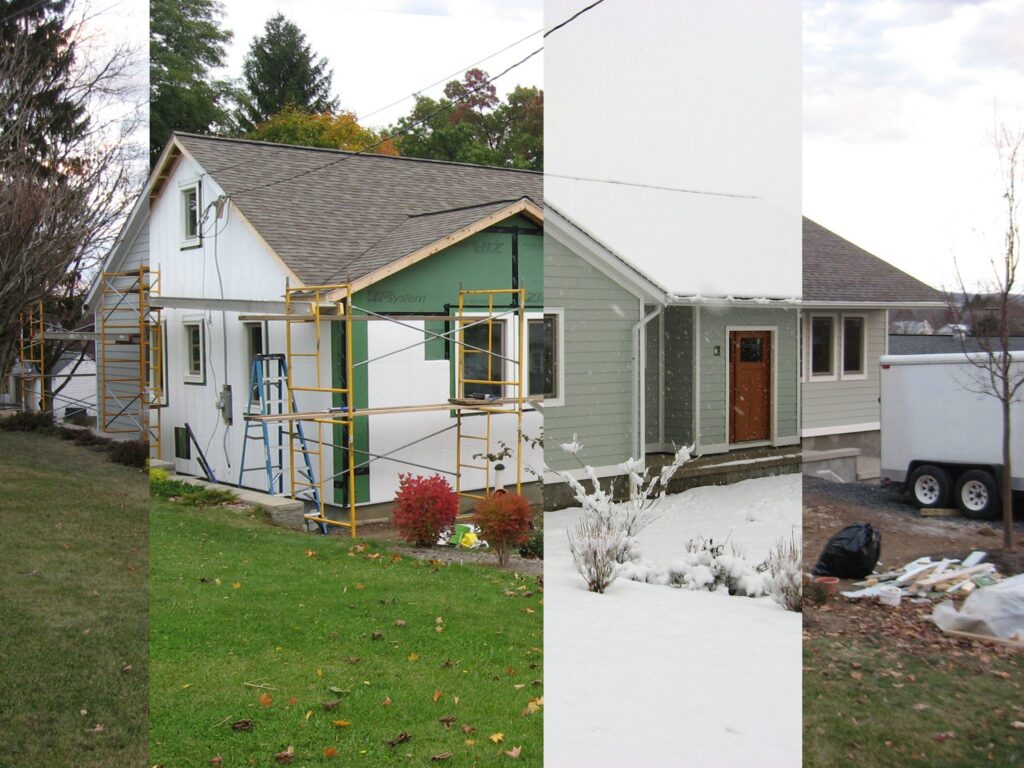
When bonding EPS and XPS foam insulation, use above 40°F (4°C) and avoid cure and surface temperatures above 90°F (32°C). Surfaces must be clean, dry and free of frost, grease, dust and other contaminants. Pre-fit all materials and protect finished surfaces. If using cartridge format, cut nozzle at a 45° angle to desired bead size and puncture inner seal. Be very careful not to allow Loctite® PL® Premium to cure on a finished surface.
Cold Weather Tips:
Interior Installation
Heat the surface temperature above 40°F (4°C) for the adhesive to cure. Once the insulation panels are placed the interior heat will not transfer to the wall surface. It is recommended to condition the application area until the adhesive has cured.
Exterior Installation (outside the home)
The surface temperature that the adhesive is applied to should be at the recommended temperature range until the adhesive has cured. (InSoFast insulation will hold the temperature at a steady state.
Overview / Technical Data
Safety Precautions and Cleanup
Wear gloves. Cured adhesive on bare skin will not come off immediately with washing and will cause skin to darken. Cured adhesive and discoloration will come off in about 3 days.
Clean tools and uncured adhesive residue immediately with mineral spirits in a well-ventilated area to the outdoors. Remove cured adhesive by carefully scraping with a sharp-edged tool.
Panel Attachment Using Fasteners
InSoFast insulation panels can be attached using concrete fasteners, wood, or steel fasteners. Use a mechanical fastener if preferred or when necessary to secure the panel to the exterior wall. The advantage to using fasteners is that you can use them in any weather condition.
Using Fasteners:
Mechanical fasteners for securing the InSoFast panels

Mechanical attachment may be the primary method for securing the InSoFast panels to the wall surface if the concrete conditions do not allow adhesive usage. Use Tapcon® screws or Perma-grip nails in the center recessed attachment point on each stud, for a total of three screws per panel for interior drywall applications. Adhered stone applications require six screws per panel.
A mechanical fastener may be necessary if you forgot to apply adhesive to a stud or not enough adhesive was applied. Use a mechanical fastener where necessary to secure the panel to the wall. Use any of the nine recessed attachment points located on the face of the attachment studs.
Screw/Nail Attachment Pattern 16″ On Center
Screw/Nail Attachment Pattern

Using the indicator markings on the panel, screws are placed 12” o.c. along the InSoFast studs per code report. InSoFast panels are generally screwed in place, however, you may opt to use nail guns to install the panels and siding provided the temperature is above 60° F for the stud to accept nails. It is up to the contractor and/or building official to determine the suitability for the nails in regard to use, length, and spacing.
For 16” O.C. Framing
InSoFast studs are 16” o.c. Install the first panel so that the built-in studs line up with and attach to the wall’s studs.
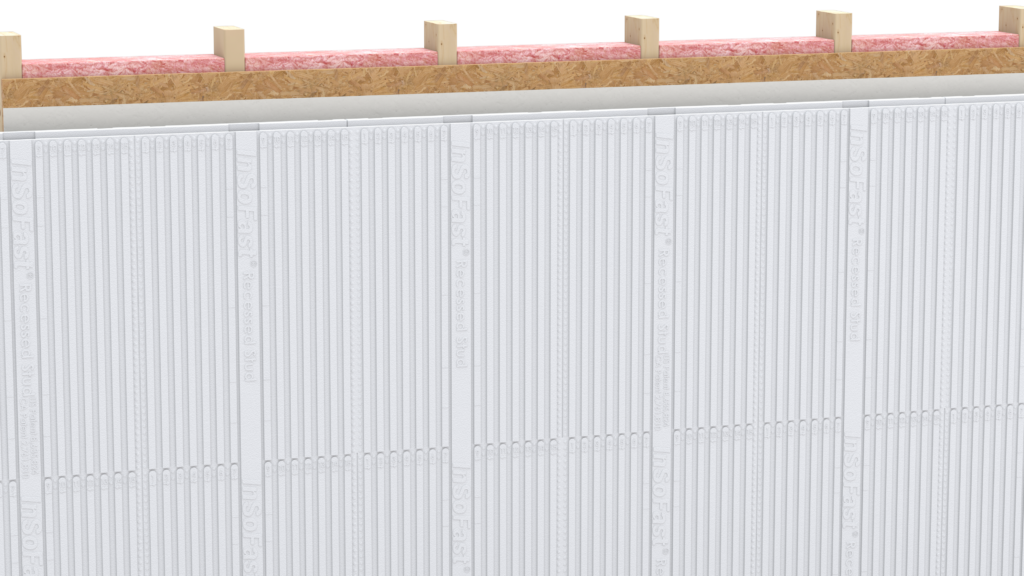
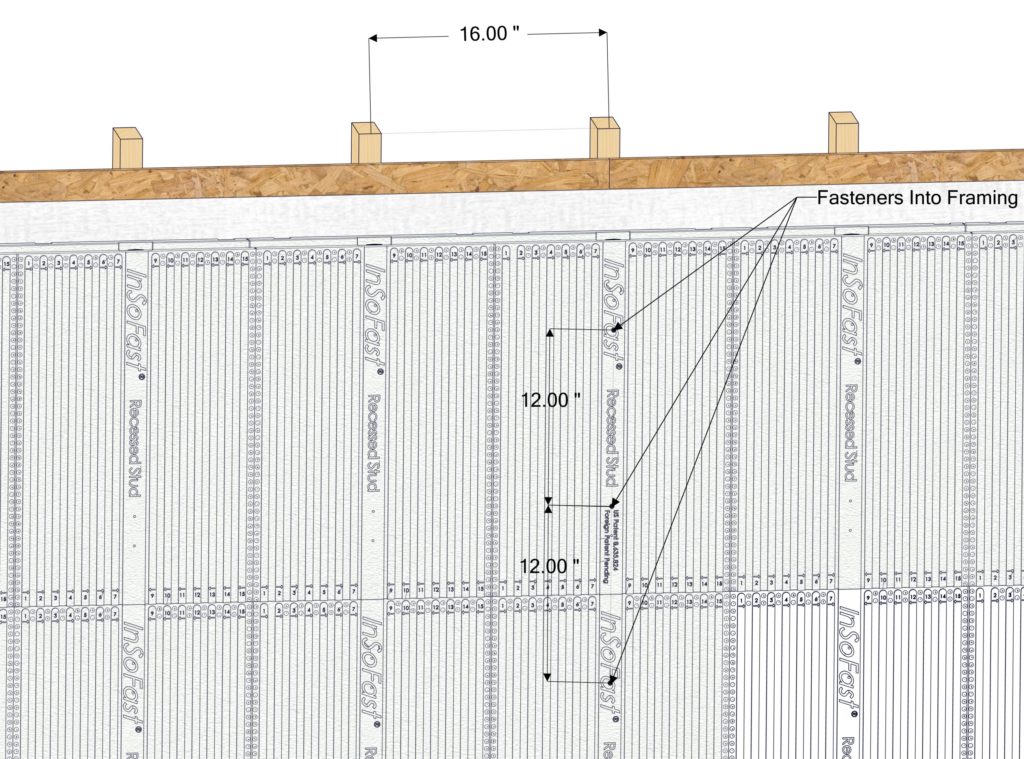
Nailing the panels to the wall when the nail has a minimum penetration into the structural framing stud, use screws if attaching to just the structural sheathing.
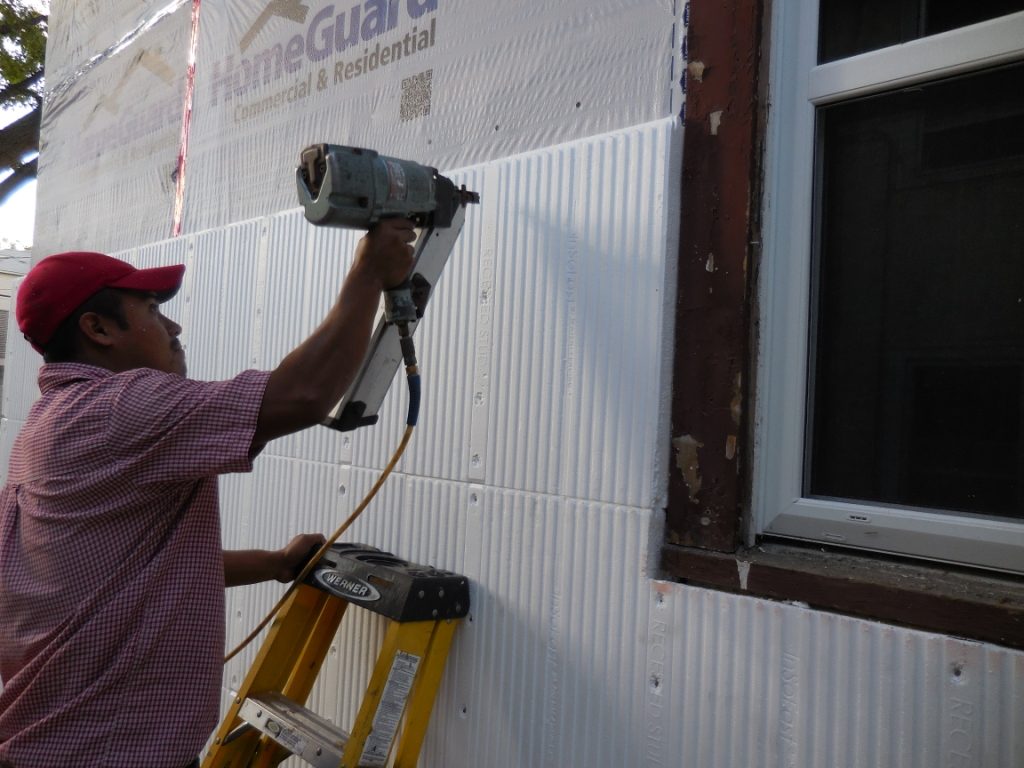
Screw/Nail Attachment Pattern 24″ On Center
For 24” O.C. Framing
Attaching to 24” o.c. framing requires a structural sheathing you can screw to, such as OSB, plywood, or SIPs and requires the use of 8” o.c. indicator marks. The number of screws is dependent on wind load requirements.


Wood and Steel Screw Fastening Guidelines
Screw Fastening Guidelines
Both InSoFast flat panels FP-2.5 and FP- 2.0 can be directly attached to concrete surfaces. The concrete fasteners design load should be able to resist the shear (downward load) and pull-out forces. Note that all design load resistance defaults to the fastener’s manufacturer’s design load tables. See Below
If you choose to mechanically attach InSoFast panels to concrete or masonry walls, screws are to be placed 12″ o.c. along the InSoFast studs. Powder actuated tools are not recommended.
- Both panels InSoFast EX 2.5 and InSoFast UX 2.0 can be directly attached to most exterior surfaces as a continuous insulation barrier for the exterior envelope of a building. Fasteners design load should be resist the shear and wind loading resistance when used to secure the InSoFast panels to concrete, wood, or steel framing systems.
- Design Approvals: Where required by code or design professionals attaching the InSoFast panels and the suggested fastening methods identified may exceed 12″ o.c. should be prepared and engineered by a design professional licensed to do so.
- Design Loads: The design loads required by the local building code authorities shall not exceed the recommendations outlined in this guideline.
- Allowable Loads: The applied dead and negative wind loads should not exceed the tables outlined in this guideline for each of the different fastening systems for concrete, wood, or steel framing methods. The required fastener spacing is determined by the different fastener manufacture’s test reports for shear and wind
loading and not by InSoFast, LLC.
Fastening To Concrete Guidelines
Both InSoFast flat panels FP-2.5 and FP- 2.0 can be directly attached to concrete surfaces. The concrete fasteners design load should be able to resist the shear (downward load) and pull-out forces. Note that all design load resistance defaults to the fastener’s manufacturer’s design load tables.

InSoFast studs are 16” o.c. If you choose to mechanically attach InSoFast panels to concrete or masonry the screws can be placed depending vertically on normal design load criteria at 24″ o.c. (Typically) for light residential duty like basements, if the wall has a lot of cabinets (etc.) 12″ o.c. would be a medium duty recommendation, or if you need to hang a really heavy 57′ Buick on the wall 8″ o.c.
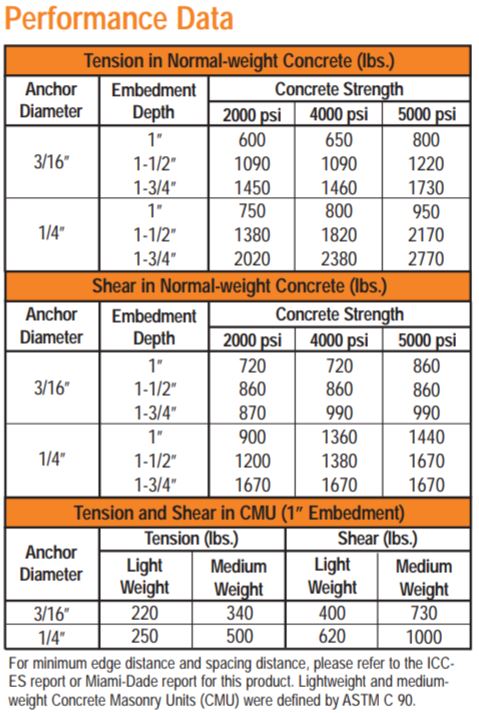
- Design Approvals: When required by code or by a design professionals attaching the InSoFast panels my be spaced closer or farther apart. Alternate fastener spacing should be engineered by a design professional licensed to do so.
- Powder actuated tools are not recommended.

CONDRIVE 500 GUIDELINES:
- STEP 1:
Place drill adapter into 3/8” or 1/2” chuck of standard hammer drill. Place drill bit in drill adapter and tighten set screw. Drill hole a minimum of 1/4” deeper than Tapcon anchor is to be embedded.
- STEP 2:
Phillips Heads may be installed using either side of sleeve. To install a 1/4 diameter Hex Washer Head Tapcon, use large opening side of sleeve (see sleeve label). To install a 3/16 diameter Hex Washer Head Tapcon, use small opening side of sleeve (see sleeve label). Slide opposite side of sleeve over drill bit and snap onto drill bit adapter.
NOTE: If driving Hex Washer Head Tapcon, driver will automatically disengage. If driving Phillips Head Tapcon, care must be taken to ensure anchor is not overdriven.
- STEP 3:
Loosen set screw on side of drill adapter with 1/8” Hex Key. Do not remove completely. Replace old drill bit with new one. Align flat side with set screw and tighten screw. Do not overtighten
The minimum embedment requirement for concrete or concrete/cinder block is 1″ and the maximum embedment is 1-3/4″. Either length fastener will work to fasten our 2″ thick stud to concrete.
ORIGINAL TAPCON MASONRY FASTENING SYSTEM
Product Specifications
Diameter 3/16” and 1/4”
Thread Form Original notched Hi-Lo®
| Part Number | Description Fastener Size | Drill Bit Dimensions | Part Number (drill bit) | InSoFast Panel thickness | |
| PFH(phillips flat head) | HWH(hex washer head) | thick x long | Tapcon able to fasten material 1-3/4″ – 2-1/4″thick. | ||
| 3177407 | 3147407 | 3/16 x 3-1/4″ | 5/32 x 5-1/2″ | 3097910 | UX2.0 – EX2.5 |
| 3191407 | 3161407 | 1/4 x 3-1/4″ | 3/16 x 5-1/2″ | 3100910 | UX2.0 – EX2.5 |
| Tapcon able to fasten material 2-1/4″ – 2-3/4″ thick. | |||||
| 3179407 | 3149407 | 3/16 x 3-3/4″ | 5/32 x 5-1/2″ | 3097910 | UX2.0 – EX2.5 |
| 3193407 | 3163407 | 1/4 x 3-3/4″ | 3/16 x 5-1/2″ | 3100910 | UX2.0 – EX2.5 |
Combined Adhesive and Mechanical Attachment

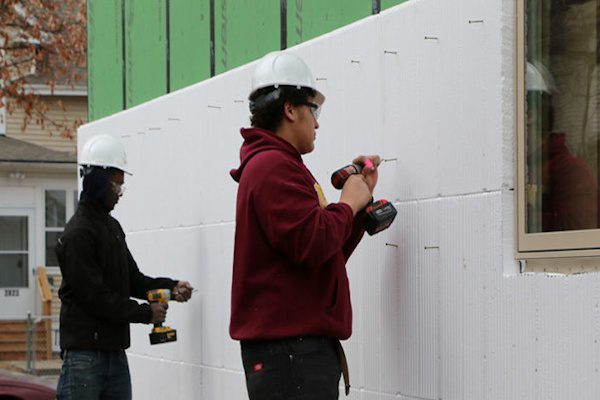
For adhered applications using PL Premium adhesive on walls that are subject to peeling or flaking paint, it is important to supplement the installation of InSoFast panels with mechanical fasteners such as Tapcon® screws or Perma‐Grip nails.
- Remember to wait at least 24 hours for PL Premium Adhesive to cure before using fasteners in your wall. Over driving the fasteners before the glue sets may pin cushion the wall. Additionally it will pull the inter-lock tight to the wall making subsequent panel difficult to install.
- Install a row of mechanical fasteners between 6”and 18” from the ceiling at 48”-O.C. utilizing the recessed attachment points that are molded into the InSoFast studs.
- Install additional row(s) of mechanical fasteners at 48”-O.C. spacing as needed to keep a maximum of 48”-O.C. spacing between rows of fasteners.
- At the bottom of the wall, install a row of mechanical fasteners between 6”and 18” up from the floor at 48” on center.


